Tag Archives: apex optics

apex optics, apex, optics, vapor, prism, variable prism, 1-4x22, sight, prism sight, prism scope, apex atom, red dot, quattro 15, muzzle blast, yhm, yankee hill machine, r9, R9 suppressor,

Variable Prism Proposition Apex Optics Vapor Prism 1-4

Preface

Prism sights are nothing new exactly, but they have certainly taken off in the last decade or so. When Trijicon brought the ACOG to the market, and it began showing up on military weapons, other manufacturers started paying attention. With their compact size and etched reticles, prism sights quickly became popular aided by their clarity and easy sight picture with magnification. One of the reasons they are so durable is because of their simple fixed magnification, some would also consider that a down sides of prisms. Today we are taking a look at one new option from Apex Optics, and this one carries a variable magnification feature. It also carries a few other feathers in its cap, so lets get into the Apex Optics Vapor 1-4×22 prism sight.

The Apex Optics Vapor Prism

The Apex Vapor is a variable zoom prism sight designed with CQB shooters in mind. Or maybe 3-gun if you are a civilian. With its 1 to 4 power zoom, it gives a great sight picture for those shooting fast and on the move. According to the manufacturer it provides unmatched clear magnification in a compact professional grade optic.

One of the main appeals of prism optics over a traditional LPVO is they eye box. Prisms have a more forgiving eye box that doesn’t require such a refine eye relief. This is ideal for someone who can go from shooting within the room to hundreds of yards downrange in the same engagement. And especially when lives are on the line.

The Vapor incorporates an adjustable diopter to focus the reticle, as well as a capped windage and elevation adjustment. The reticle is lit red by a variable rheostat on the left side, with 11 different brightness settings. The etched FIRE™ reticle has a fine aimpoint as well at a large ring for bracketing close targets. And for targets that are a bit further out, there are several holdover points on the reticle for corrective holdovers.

Specifications

Magnification1–4×
Objective22 mm
Ocular Lens35 mm
Eye Relief3.64″ / 88 mm
Field of View @ 100 yd127.53 ft @ 1× / 34.94 ft @ 4×
ParallaxFixed at 100 yd
ReticleFIRE™ etched prism
Focal PlaneSecond focal plane (SFP)
Adjustment½ MOA per click
Adjustment Range80 MOA
Clicks/Revolution60
Length5.5″ / 140 mm
Weight13.9 oz optic only / 15.8 oz with mount
Body6061-T6 aluminum
BatteryCR2032
WaterproofIPX7
Shock Rating1,000 G
Operating Temperature−4°F to 140°F
Objective Coating7-layer proprietary coating
GlassJapanese ED apochromatic glass
Light Transmission99.7% per lens
MountingRMR-pattern red-dot mounting capability

And if all that wasn’t enough, the Vapor also incorporates a built-in piggyback option for your favorite RMR footprint red dot. Many short range combat weapons incorporate something similar to allow an up close zero parallax aiming option. Additionally Apex Optics offers a 45-degree mounting plate so you can add the red dot sight to the side of the Vapor if you don’t want it on top.
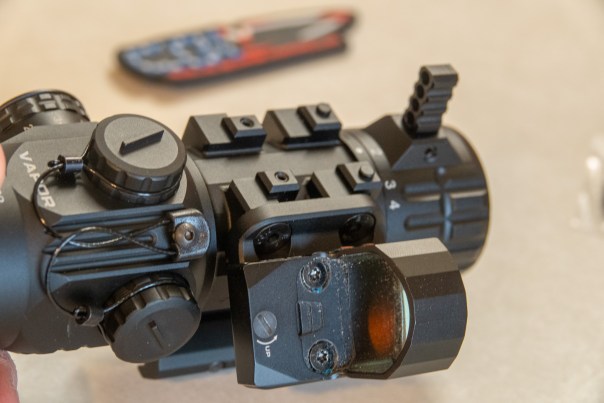
the Apex Atom red dot fit perfectly on the 45-degree mount

Mounting Solutions

Mounting the Vapor can be done a few different ways. There is a picatinny clamp option that uses several screws to clamp the foot of the optic to your rifle. They also have a QD option that allows you to clamp the optic in place, or remove it with a quick motion.

changing out the picatinny clamp foot

Additionally they have different heigh foot spacers that allow you to mount the Vapor in a high or low position to better fit your needs. After unboxing the Vapor, I took a few minutes to familiarize myself with these different options and swapped a few things around. I was surprised they even installed stub screws into the screw holes to prevent them getting damaged or filled with crud.

stub-screws that keep the threaded bosses protected

I also took a moment to mount the 45-degree red dot mounting plate with the provided fasteners. Since I had it, I installed an Apex Optics Atom red dot with its compatible RMR footprint.

On the Range

I would end up using the Apex Vapor on a few different rifles, all semi-automatic carbines. Various trips to the range. Shooting distances as close as 20 yards and as far away as 400 yards.

Optical Clarity

Even from the very first time I lifted the vapor to my eye, it was impressively clear. Prisms are usually impressively clear and sharp for their size, and the Vapor was no different. At all points in its magnification zoom, it looked fantastic with sharp detail.

illumination of the reticle

Reticle

After shooting with the Apex, I did a little looking around on what others are saying. I was surprised to see how many people have a problem with the reticle, as I found it to be quite useful. People will always argue over minutiae and their preferences for subtensions and hold-over points.

I found the Fire reticle to be perfectly useful, with a typical large ring around the central portion of the reticle. This large ring creates a much smaller one when the Vapor is zoomed out to 1X, making a nice small point to put on your target while squeezing the trigger. And when zoomed-in, the large circle allows you something to bracket the target.

the reticle offers a variety of hold-over points for further ranges

The various hold-over points on the lower elevation of the reticle give you repeatable marks to hold on your further targets. The indicated values in the manual are handy, but at the end of the day I just see where each point coincides with a given distance and keep those results tabulated.

Controls

The only significant controls on this optics are the zoom feature, and the brightness settings for the reticle. The brightness is similar to everything else you’ve ever tried, there are 11 settings with an off between them.

The zoom feature on the other hand is a bit unorthodox, with a throw lever attached to the magnification ring up front. It does feel a bit odd reaching to the front of the optic to adjust the magnification. But because its so small though, its not a far reach. I did find one thing that I wouldn’t call a problem, but felt weird. The throw of the lever is pretty short, and when it reaches the end of either end, there is a solid stop. So you don’t want to get too aggressive pressing on it.

Durability

Obviously time and use is the best way to test a products durability. While I fully plan on giving the Vapor a solid wringing out over the next year or so, that takes time. Fixed prism sights in general are tougher than variable magnification optics, but the Vapor itself is also variable. So it stands to reason that it might be less durable than a fixed prism sight. Time will tell.

here you can see the magnification throw lever up front

Value

The Apex Vapor is not what I would consider an inexpensive optic, with an MSRP of $950 it is certainly not entry level either. Additionally, the Vapor has a relatively specific purpose, which makes purchasing the Vapor a very deliberate choice. If you are looking for a variable zoom prism though, there aren’t so many options.

the host Quattro-15 rifle outfitted with the Wolfpack Armory Romulus suppressor

Perhaps it would be somewhat comparable to evaluate it against a 1-4 power LPVO. Of which there are many options and you can probably get them for a lot less than the Apex Vapor. But a bunch of cheap 1-4 LPVO’s does not equate to what this optic offers you. In fact, comparing it to some of the nicer 1-4 LPVO’s like those from Steiner, Trijicon and Leupold would be a better comparison. The Vapor is cheaper than those options, and other than tactical style turrets it has many of the same benefits in a more compact sight.

next to a small LPVO riflescope, the Vapor has a smaller footprint

There are a couple larger 4x and 5x prism sights from companies like Steiner and Burris, but they are fixed power. And depending on the model they might be only slightly cheaper.

Mounting Options

The Apex Vapor is available with a couple different spacers to change the optic height. Additionally you can get it with either a screw clamp foot or a QD foot. One can give you fast optic swap, and one is more compact and less likely to get snagged on your gear. Both of them give a solid interface with the host weapon.

you can choose the Vapor with either a screw-clamp foot or the QD lever foot.

Pros and Cons

Compact SizeCostlier than Most Smaller Prism Sights
Sharp and Clear Image
Very Usable Reticle
QD Foot for Faster Install and Removal
Short 45-Degree 1-4X Throw
Easily Mounted Piggy-back Red Dot 
Tethered Caps That Double as Tools
Etched Reticle
the 45-degree mount for a red dot rotates perfectly into place for point-blank shooting

Final Thoughts

I really quite like the Apex Optics Vapor. I’ve been on an LPVO kick for a few years now, and the Vapor’s size is refreshing while still bringing the sighting options. The images seen through the optic are fantastic and clean, and its factory piggy-back red dot options make it easy to pick. And Apex Optics thought through the Vapor, with variable mounting heights and QD mount. If you are considering a high quality 1-4 power sight for your carbine, it certainly is worth taking a look at before making your decision.

-CBM

Check out other Prism Sights here

Apex Optics atom red dot

Apex Optics Atom Red Dot

Preface

Apex Optics is a relatively new manufacturer in the optics market, with their roots planted firmly in the mountains of Alberta Canada the company has aggressively pursued the firearms market worldwide. I was introduced to Apex Optics with their Rival precision rifle scope, and I’ve been shooting with it for about a year now. Having experienced great performance from their product, I embraced the opportunity to try another. Today I bring you my impression of the Apex Optics Atom red dot, a compact reflex sight.

The Apex Optics Atom

The RMR footprint is a very popular style, and the Atom utilizes this footprint for its universally accepted popularity. Using a battery to power it’s Smart-Light auto adjust reticle for up to 50,000 hours. With a structure made from aluminium, the light and robust Atom is made to last. Incorporating as much technology as possible was done by adding their 7-layer lens coating as well as incorporating motion sensing electronics to power up the unit with any activity.

Apex Optics Atom red dot

Whats in the Box

In the box comers the Atom red dot, as well as a picatinny rail mount should you chose to mount it to a carbine or other type of weapon. There also came three different screw sets to help you with options for mounting on different firearms. There also came the typical literature and lens cloth, the manual came with a great deal of information on how to configure, adjust and mount the Atom. And of course it came with a custom tool that helps get the right fit to both mount and adjust the Atom. In addition to whats included, the Atom also has the ability to install a hood (available separately) that encloses the red dot. Protecting it from dirt and debris.

Specifications

  • Footprint: RMR
  • Magnification: 1X
  • Wind/elevation range: 100moa
  • Eye Relief: Unlimited
  • Battery Type: CR1632 3V
  • Reticle: Apex MRX reticle
  • Shockproof Rating: 1500G
  • Dimensions: 46x31x26mm
  • Operating Temp: -30C to +60C
  • Weight: 31 Grams
  • Brightness settings: 10 (plus Auto)
  • Battery life: 50,000 hrs at setting 4
Apex Optics atom red dot installation
Installing the Atom, note battery compartment

Installing the Atom red dot

I decided to install the Atom on my BCA Grizzly, a Glock 17 clone with a slide cut for the RMR footprint. This would make it easy, and using the provided screws and a couple drops of blue Loctite it was done quickly. When mounting red dots I always try and ensure as I bolt them down to the slide that they are as close to lining up with the iron sights as possible. This practice reduces the need to adjust the reticle much after install.

On the Range

Once I’d done that, it was time to head to my shooting spot to test them. With quite a few boxes of Trailforger 9mm ammo, I wanted to have good time while testing this little dot. The first thing I had to decide was how I wanted to configure the reticle. The MRX reticle is a circle dot style reticle, you can select between the 2MOA dot alone, the 34MOA circle alone, or the two features together if you like. I ended up mostly using the circle, its small enough that I would basically just bracket whatever it was I wanted to hit and squeeze the trigger. More precise shooting could be done using the 2MOA dot.

Apex optics Atom red dot

Adjusting the reticle and brightness is all done using the two buttons on the left side of the Atom. As well as set the Smart-Light feature. The lowest two settings are designed for night vision use, which is pretty typical. I also noted that the manual mentioned something I see on most red dots, it is recommended to not use the dot on the highest brightness settings unless it is warranted. The highest brightness settings often cause a glare and whats called “reticle blooming”. Reticle blooming is when the reticle becomes so bright that it looses it definition and makes aiming harder. This affects all red dots in my experience, which I usually use on the lowest setting that is clearly visible while shooting.

A nice look at the generous window of the Atom red dot

The Atom was very nice to shoot with. The brightness was more than enough for midday shooting, and it allowed me to accurately hit my targets. I have recently gotten used to the extra-large window of some other red dots, so it took a minute to get used to the slightly smaller window of the Atom. Once I’d familiarized myself with it though, I really liked the less obtrusive window size. I feel like I’d like to put this on my CCW pistol for confident shooting.

While the lower housing of the Atom was a touch too thick to allow the use of my iron sights, I was still able to use them by using the “look through” method. Basically pretending the obstructed front sight isn’t obstructed 😅. These sights are pretty low profile, so any slightly taller sights would be useable through the Atom red dot.

The significant travel of the reticle mechanism in the Atom is very nice, should you need to make big adjustments to zero. Luckily I didn’t for this purpose, but I was happy to see there was so much adjustment available as other red dots I have only offer a third of the movement range.

Apex Optics Atom Red dot
the BCA Grizzly 9mm pistol matched nicely with the Atom red dot

Pros and Cons

Lets talk about the pros and cons of the Atom. First of all, keep in mind that I am used to quite a variety of different red dots.

I like the size of the Atom for the RMR footprint, I like that it has a rounded top with fewer corners to snag on things. Despite being smaller than many of my other red dot windows, I still feel like it is big enough to be very useful.

The reticle options is where it really shines, as we all love having options. I like that you can select the various circle or dot options, and the motion activation and auto-brightness are a fantastic options to have.

The fit and finish of the Atom is outstanding. The tight fit of all the parts and fasteners make for a very professional presentation. As do the packaging and included accessories.

If I had to change something on the Atom it would probably be this; I like the reticle options, but I wish there was like a 40, 50, or 60 MOA option as well. I am ready to accept that this is simply my personal preference though. I wish I’d gotten one of the Weather Shield hoods for the optic as well, to see how it works and if it inhibits function at all.

Apex Optics Atom red dot
the Atom lined up nicely with iron sights and the natural aim point

While I have no reason to suspect any failure, I was surprised that the battery compartment is secured only by a friction detent. Part of me wants to think a screw or other mechanical method of securing would be better. But in all my shooting, I cannot think of a scenario where it could be knocked out. So I think its fair to say my concern is misplaced.

Apex optics atom red dot

Last Words

Much like my previous experience with Apex Optics, the Atom has left me with a great impression. There are so many options out there for red dots these days, so standing out from the crowd is a challenge. I think the Atom offers some great features, there are others that offer similar performance for less, but they don’t stack up as well. And those who’s features exceed these, are priced above and even well beyond what the Atom costs.

While I like my dollars to stay in America, I’d rather send them to Canada than China or some other sweat shop. Especially when there are better options like these made in Japan where there is a higher quality standard. If you find yourself looking at the Apex Optics Atom red dot, I think you will enjoy shooting with it and feel satisfied with your purchase.

-CBM

Shop all Apex Optics Here

buy Apex Optics
desert tech srs m2 apex optics

Apex Optics Rival 4-32X56

Introduction

I love riflescopes, and the market has become more and more competitive in the last decade. Bringing you new rifle scope options is one of my favorite things to do, and today I am bringing you another one. Today we are going to look at a new to me brand, the Apex Optics Rival 4-32×56 scope.

The optics market has recently been flooded with a great selection of imported optics. And today I am adding another one to my list. The Apex Optics Rival is a 34mm tube riflescope, with an eight power zoom and first focal plane reticle. Like most scopes in this range, it also includes a side focus/parallax adjustment, and illuminated reticle.

With a plethora of fantastic rifle scopes in my collection, I was happy to add this one to the pile and see how it stands up to the rest. The features of the Rival are ideal for competitive long-range shooting, or any other application needing high power and ballistic compensation.

The Apex Optics Rival 4-32X56

Specifications

  • Tube Diameter: 34mm
  • Objective Lens: 56mm
  • Magnification: 4-32x
  • FOV @ 100y: 29.9ft-3.73ft
  • Eye Relief : 3.54″ (90mm)
  • Exit Pupil: 8mm-1.6mm
  • Parallax Range: 15y-Infinity
  • Glass Type: ED
  • Focal Plane: First (FFP)
  • Reticle: CLR (Illuminated)
  • Reticle Type: Glass Etched
  • Elev. Adjustment: 32 MIL
  • Wind. Adjustment: 20 MIL
  • MILs Per Rotation: 15E / 10W
  • Turret Rotation: CCW
  • Illumination Color: Red
  • Illumin. Levels : 6 w/ On-Off between settings
  • Length: 15″ (381mm)
  • Weight : 37oz (1049g)
  • Mounting Length: 7.4″ (189mm)

The Apex Rival is not a compact model, as you can see by the size dimensions. And weighing in at thirty-seven ounces it’s a bit chubby when compared to your traditional hunting rifle scopes. So I guess what I’m saying is that this isn’t a scope for your typical hunting rifle, it means serious business.

Serious precision rifle shooting usually doesn’t concern itself with weight though, so big optics like this are welcome. PRS circuit shooters are usually adding weight to their guns, so putting a serious scope like this isn’t a problem. The Apex Rival also incorporates a bunch of the features that dedicated marksmen use frequently. Adjustable turrets, first focal plane milling reticle are just some of those.

As I opened the box to inspect the Rival, I was impressed with its presentation and accessories. The scope is nicely packaged, and comes with battery, sun-shade, manuals and other swag.

apex optics rival packaging
Handsome quality packaging with plenty of goodies

Mounting the Apex Rival

As a complete optics nerd, I couldn’t wait to get this scope mounted. I grabbed one of my Area 419 scope mounts to use as a mounting interface, you can read more about that here. After leveling the scope and torquing down the fasteners, it was time to stick to a rifle. For that, I chose my Desert Tech SRS M2 with the 223 Remington barrel. This rifle has been one of my favorites over the years, and with the 223 barrel in it, I was sure to give the scope a good exercise.

With the rifle and scope mated, it was time to get busy with it. But before leaving the house I did a quick tooless boresight job. I grabbed some ammunition for the rifle, as well as the rest of my gear and headed to the open Rocky Mountains.

desert tech SRS M2 apex rival scope
Mounted up and ready for action

Zeroing

Once I got to my shooting position, I set to zero the Rival. Sometimes when I’m in a rush, I will simply use an open patch of dirt. Picking out a small detail and firing a shot at it shows what corrections I need to make. After repeating this process as many times as needed, I pick out a tiny little rock chip and see if I can hit it.

desert tech SRS M2 Apex optics rival

The high power magnification of the Rival allowed me to see not only the impact of the shot, but also to pick out the white dusty remnants of the rock chip. I confirmed the results a few times, just to satisfy the sharpshooter in me.

I love shooting in the barren springtime mountains, besides the beautiful signs of spring and singing birds, there is a refreshed feeling of renewal. The spring snow keeps much of the public far away from my operation, and that’s fine by me.

This rifle is very predictable, and I have a solid drop chart programmed into my ballistic computer. So the very first thing on the menu was a target six-hundred and eighty yards away. A flat rock face tucked into a steep chute full of brush. The smooth surface with various lichen spots made a perfect aimpoint, and one I could follow up on.

Apex Rival scope 223 remington cartridges

I was shooting Nosler RDF 85 grain bullets which even at six-eighty hit with some impressive power. The impact left nice little white marks on the rock face as the bullets disintegrated into the soil around it. Using the CLR reticle I measured the difference between my point of aim, and the impact and made an adjustment. With a better wind hold I was stacking one white mark right on top of another.

Shooting Long-range

It was time to stretch this thing out a bit more. After all, part of the reason I went with the 223 barrel today was to give this scope a good workout. The 15 MRAD turrets of the Rival are very nice, I much prefer 10+ MIL turrets like these because it’s much harder to get lost in your elevation. But that’s almost impossible with another great feature, the turret rotation indicator.

Desert Tech SRS M2 Apex Optics Rival
steadying the rifle over the MDT GRND bipod

Once you dial past fifteen MRAD on the elevation turret, there is a small indicating pin that pops up on the top of the turret. This allows you to both see and feel if you are on the first or second rotation. Due to the huge fifteen MIL turrets, only two rotations are needed to hit 30 MRAD which is well beyond anything I typically shoot.

I found the eye box to be fine, though some of my shooting companions did mention they thought it was a bit touchy. Meaning they felt they had to be perfectly situated behind the eyepiece to be able to see well. I didn’t experience that at all.

Shooting distances like 940 and 1200 yards was a nice little poke for the rifle. And spotting puffs of white at those distances was easy through the Rival. Dialing the turret back and forth between targets felt nice as I could easily count the clicks, and feel them too.

Like most every other scope I’ve ever tested, the Rival darkens some at max power. I rarely use scopes at their maximum magnification, especially when it’s 32X. Which brings me to another thing I like about this and other high mag scopes I have. This scope is clearer at 25X than most scopes that max out at 25X, just because it’s an 8-32 doesn’t mean you can’t use it like an 8-25. I usually use all my scope at roughly 80% of their max power at any time. I prefer the clarity over the magnification.

Apex Rival Features

CLR Reticle

While shooting at these distances the CLR reticle was great. I really like open center’s like this one has, nothing but a very fine dot in the center of the crosshair. The reticle gives a good amount of holdover and measuring subtensions, and also staying open enough to allow seeing low impacts downrange.

apex optics CLR reticle

This made for quick corrections while shooting in the field. The grid part of the reticle allows you to quickly spot your impact, and estimate quick corrective solutions. Both windage and elevation can be quickly figured out and either dialed or held for the following shot.

Illuminating the reticle is easy with the rheostat mounted on the parallax turret. There are many brightness settings with an off setting between each.

Apex Optics Rival
Note parallax adjustment and reticle illumination stacked

Turrets

The elevation turret of the Rival reminds me of my Kahles K318i, it has a very similar function and design. Which sort of makes a zero-stop unnecessary. The clicks are very clean and audible, and more importantly they track perfectly with the reticle. I mounted the scope to a table for the purpose of some tracking testing. I was very happy to see that over a many courses of motion I could always expect the reticle to end up exactly where anticipated

Apex Optics Rival 4-32x56
Zeroing elevation turret

Throw Lever

The magnification ring can be quickly adjusted using the throw lever, or cattail as they are sometimes called. The Apex throw lever is open in the middle, which allows you to see your turret through the lever should it be in the way.

Apex Optics Rival
the throw lever is both removable and vented to see through

Sunshade

Included with the Apex Rival was a perfect fitting sunshade. The shade extends the front of the objective preventing light glare from obscuring your view. This comes in very handy when looking in steep country where the sun could close or even behind your target area. The sunshade prevents the light from hitting your lens unless you are looking almost directly at it. Also included were to obligatory cheap flip caps, that obviously work but I don’t expect to last.

Parallax/Focus Adjustment

It’s become very popular to use a side adjust parallax turret. This allows you to remove the effect of parallax in your image, and get a sharp and clear impression of both the reticle and the target.

SilencerCo, Omega 36M, Omega, silencer, suppressor, modular, 5.56, 9mm, 250, 338, desert tech, srs m2, apex optics, rival, two vets tripod, two vets, no-name inverted,
even at high power, the Rival looks good, especially steadied on my Two Vets No Name V2 tripod

34 Millimeter Maintube

The larger 34mm main tube allows for a very robust structure and larger diameter erector. This is part of why the scope has such a broad movement capacity of 32 MRAD. It has also become a very popular size resulting in a great variety of mounting options like the one I used here.

HTX Lens Coating

The HTX lens coatings are applied to help light transmission through the scope. The extra low dispersion lenses are manufactured to optimise wavelengths of light coming through them. Both the coating and the lenses themselves help provide as bright an image as possible.

Apex Optics Rival Desert Tech SRS M2

Apex Rival Pros & Cons

Pros

  • Great optical quality- suitable for competition and precision shooting
  • 15 MIL turrets- for concise elevation adjustments
  • Milling Reticle- the CLR reticle works great for holdovers and corrections
  • 8X Zoom- gives you a broad spectrum of magnification
  • Included Extras- sunshade, throw lever
  • Turret Indicator- to keep track of turret rotation
  • 34mm Tube- universal size with longer internal travel
  • Illuminated reticle- for low light shooting
  • Robust Construction- heavy duty and built to last
  • Accurate and repetitive tracking

Cons

  • Loses clarity at max magnification
  • I don’t care for the orange trim
  • Promotes Canadianism 🇨🇦

Final Thoughts

After shooting with the Apex Rival for a while now, I only look forward to shooting it more. Many shooters are quick to discount import rifle scopes unless they come from Europe, but scopes like this are rapidly changing minds.

Apex Optics Rival 4-32x56 Desert Tech SRS M2

With the Rival mounted on my favorite gun, I feel up to most anything. It provides a fantastic picture with an above average magnification spectrum. The controls are crisp and concise, and perhaps more importantly they track accurately. I really like the reticle, it is a good match to the scope’s optical abilities. There were really few things I could come up with that I didn’t like about this scope.

At over $2000 it isn’t cheap by any means but you can certainly spend more. The Rival is in a touchy situation; it’s too big an investment to be easily bought and tested as a casual purchase. But it’s also not as well known as other scopes that people can confidently invest their money. If my experience using this scope is any indicator, I think it is worth its asking price. A comparable scope made in the US or Europe would easily cost at least another five-hundred dollars. My intention is to continue giving this scope a good workout, stay tuned to see more about it.

-CBM

If you like this one, check out one of our other scope reviews