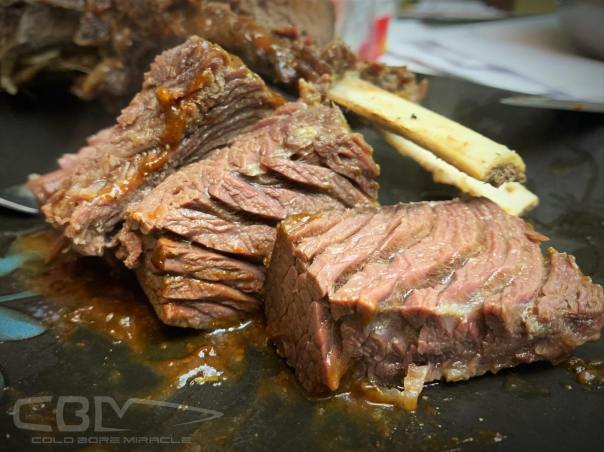
If you’re anything like me, you have at one time or another debated what to do with deer ribs. You can always trim the meat from betwixt the bones and add it to your burger pile. But what if there was something tastier you could do? I’ll let you in on a little secret; my recipe for twice cooked venison ribs.
using smaller caliber rifles can often save much of your game meat vs. a 300 Shit-house-blaster magnum
Why?
Deer ribs can often be insignificant, elk are much meatier. Either of the two are going to be pretty full of fat. Many of us (myself included) don’t particularly care for the flavor of deer tallow. This recipe is the best way I’ve found to overcome that overwhelming fat issue, and enjoy ribs the way they are meant to. I have used this process on both deer and elk ribs, with excellent results.
If you are looking for a way to enjoy the ribs off of your game, follow along to eat like a king.
Trimming Ribs
As soon as you’ve got your animal cleaned and out of the field, it’s time to think about ribs. Don’t waste time to rinse and get any excessive blood or other contaminants from the ribs. I always age my meat, but ribs can easily dessicate rapidly. For that reason I often remove them first.
Big Nate love’s him some deer ribs
If you haven’t destroyed one or both of the racks of ribs with you super-magnum, cut them out before they dry too much. I use a sawzall, and cut the ribs basically along the edge of the backstrap to the shoulder. If the brisket is insignificant enough to not use as a stand alone cut, leave on the ribs to eat it there.
Split the rib cage along the front to give you two clean rib racks. Then I freeze them at least a little bit to make them stiff enough to cut again. Take special care during the process to not ruin the layers of meat and fat. Try to keep everything intact as possible. I like to cut them into narrower long strips. This allows easier handling, and simplifies our next step.
First Cook
Vinegar or Lemon juice (or both)
Salt
Pepper
Garlic
Paprika
Bay leaves
Garlic cloves (2-20 as you see fit)
With your ribs clean and trimmed, it’s time for the first round of heat. I like to use a pressure cooker, because I’m impatient. I season up the ribs with my favorite seasonings, and then stuff them into the pressure cooker.
I then fill the cooker with as much water as it will safely hold to cover the ribs as much as possible. Seal up the pressure cooker and let it run for forty minutes to an hour. As this happens, the layers of fat within the ribs melt and float to the top of the water.
Once the time has been reached, I remove the heat and allow it to cool. Once you open the pressure cooker, you will notice the ribs have shrunk significantly. And if you’ve done it right, they will be fall-apart soft. You’ll have to carefully remove them from the pot to avoid breakage.
Second Cook
Now it’s time for round two. You could eat them just as they are, and it would probably be fine. But round two is where it gets really good. I re-season the ribs with more lemon juice, and some course salt (or flake). If you are going to add BBQ sauce, you could do that as well.
Once again you’ll need to carefully pass the ribs onto your grill or smoker. High heat is perfect for rapidly searing the exterior of your tender ribs. I like to scorch them so the remaining fat melts even further and crisps-up into tasty bits. As the fat melts, it permeates through all the meat adding flavor and moisture.
I rarely keep them on the grill (or broiler if your an apartment dweller) for more than a few minutes. Just enough to crisp them up. Once they are done, you can serve your twice cooked venison ribs however you wish. I like to pull all the bones out, and you can simply mash them with a fork and eat everything.
Conclusion
There is something magical about this process that makes even the undesirable deer fat taste good. There is no game flavor left, only the delicious greasy feeling of ribs melting in your mouth.
These must be served hot off the grill, and eaten quickly. Deer and elk tallow can setup like candle wax in a very short time, so enjoy them quickly. And I’d recommend a tea afterwards versus a cold soda.
I have never had a bad batch of twice cooked venison ribs cooking them this way. Alter the process to fit your needs, and enjoy every bone in cut you can!
Venison shanks are an underrated delicacy, and one that is often discarded for the grind-pile. Today I’m going to share with you my version of a tasty recipe I often remember from my grandfather. Today we are cooking roasted venison shanks.
Ingredients
2 or more venison (or comparable) shanks
2-4 potatoes
A dozen small carrots
Red wine
Can of broth
One half onion
As much garlic as you dare
Garnish (Parsley, chives, chopped peppers)
Season list (below)
two shanks trimmed and cleaned up for cooking
History
My grandfather raised sheep his whole life. During that time, he perfected cooking lamb shanks. And we grew up eating lamb shanks on Sundays as a special treat.
My grandfather in the late 1960’s. The deer being cooked today was taken just out of frame on those same mountains
The shank of an animal, is the lower portion of the leg. From the knee down. These parts of the animal are often discarded to the scrap or burger pile due to their nature. They are quite full of sinew which makes them a challenge to clean up.
And due to their location, they often dry out more than other parts of the animal during the aging process. Today’s recipe will help you turn these sometime less-desirable pieces of your game into a delicious delicacy you’d proudly serve your family.
Preparing your venison shanks
a Sawzall makes short work of the shanks, and doesn’t mess up the meat on the bone
Start by removing the shanks from the animal, I prefer to do this after at least a day or two of aging. I use a saw to get as clean a cut as possible without disturbing too much of the meat on the bone.
Additionally I saw off the lowest portion of the bone (the ankle area) since it is mostly bone and unnessesary. Opening both ends of the bone also allows the cooking process to liberate the marrow inside, which is full of taste and nutrients.
Ingredients
Once the shanks are removed, clean them as best you can. Scoring the exterior of the shank slightly in many places also allows penetration of your seasoning. Season the shanks as you like, but this is my way:
Olive or avocado oil
Salt (or garlic salt)
Oregano
Rosemary
Coriander seed
Bay leaf
After a healthy rub of oil, add the rest of your spice list. Allow them to marinate thusly for as long as possible. Pass the shanks into a rippin’ hot cast iron to brown them. Prefferably to get a good even crisp around all surfaces.
Basting the shanks in hot grease while they brown
Cooking
I also like to add either bacon grease or other lard and baste the shanks in the hot grease while they brown. Once the shanks are browned, I add a glass of red wine (cabernet) and reduce by half.
Adding red wine to simmer and reduce
If you like things a little spicy like we do at my house, I also add some chopped jalapeños from my garden. But you do you. Half an onion and several cloves of garlic are coursely chopped and added to the pot as well. Followed by one can of your preffered broth.
Add your broth after reducing the wine
You can either pass the roasting dish to the oven, or put the entire mixture into a slow cooker. Oven roasting would ideally be done for around 3-4 hours, while slow cooker can be done up to 8 hours. Cook the shanks until they are falling off the bone. When done you should have to carefully remove them with tongs to prevent them falling apart.
Slow cooker tip: Do not completely cover the slow cooker crock with the lid, as the condensation will “wash” the color from your shanks. Leave it slightly open to allow vapor to escape. Add water as needed.
Towards the end of the cooking process, add a bunch of carrots and potatoes. Put them in with enough time to finish cooking with the meat. And soak up some of the delicious flavor.
add vegetables towards the end of cooking
Serving
When the shanks are done, plate them with vegetables and top with some fresh chopped veggies and perhaps some parsley or chives. I’ve used peppers here for a kick.
a tender and tasy dish
Roasted venison shanks is a greasy delicious meal that feels like something from the old world. The cooking process renders all the tendons and fat down into a tasty and nutritious gravy you can serve over the vegetables.
Dont grind up your shanks, they can be a delicious special meal during hunting season. Apart from rendering every part of my game animals into a meal, this recipe also reminds me of those cold winter Sunday afternoons eating a hearty meal as snow falls outside. Enjoy these roasted venison shanks.
I recently shared one of my favorite recipes with the good folks at Carnivore Magazine. If you haven’t tried it yet, this video will probably have you salivating on your way to the kitchen. This recipe is particularly useful for old and perhaps neglected meats left over in the freezer. Give this venison butternut curry a try!
Ingredients:
2-3 lbs of red meat (Deer, elk, antelope)
Two onions (one red one white)
four tomatoes or a can of stewed tomatoes
four garlic cloves
two celery sticks (whole)
Fresh Cilantro
One Butternut Squash (or equivalent)
One can of Beef or Chicken broth
A handful of barley or oatmeal
About 1/4 cup of:
Red Wine
Soy sauce
Bacon grease or oil
About a tablespoon of the following:
Curry Powder (red or yellow)
Salt
Pepper
coriander
oregano flakes
About half a Tablespoon of the following:
Paprika
Cumin
Mashed potatoes or rice makes an excellent base for this meal.
Every now and then a brilliant idea comes to me, nothing earth shattering or anything, just a plain good idea. As I was coming down off of the mountains the other day, my stomach made me quite aware that we’d skipped breakfast several hours earlier. So as my thoughts wandered about the delicious meal I needed to make upon arriving at the house, I put this together; Spicy Venison Skewers.
It’s probably been a million years since the first dude stuck a piece of meat on a stick over a fire, so I surely wont make any claims to that idea. But today I was going to try something a little different, and it started with a two year old deer backstrap that had been resting quietly in the freezer. I thawed it out, but before it lost its stiff composure I sliced it into thin quarter-inch sized slices. From there it went into a bowl where it was seasoned with soy sauce, salt & pepper, garlic salt, a touch of paprika and some avocado oil. As the mixture lay resting and soaking on the counter coming to room temp, I finely chopped some beef suet that I had left over from making burgers. I rendered the fat down until I had a half-cup or so of liquid fat, which I also left to cool to near room temp. Just before the fat began to lose it’s liquid flow, I dumped it in on top of the meat, and rolled everything around so it was evenly coated.
Once the meat was fully coated, I sliced white onion and green chilis to roughly the same size and thickness as the meat. Then it all was skewered onto two sticks (to keep everything from spinning), I stacked them: meat, chili, meat onion, meat chili, meat onion and so on.
As I stacked them up, I was careful to spread as much of the liquid marinade running off the meat onto the veggies, and when I was done, I had two heavy kabobs of spicy delicious venison. I gave them one last dusting of course salt, and set them onto a scorching hot grill.
After a few minutes or so, I rolled them to keep the oil from all running off the kabob. Just enough to keep both sides evenly cooked I would rotate them until the meat was just about done. The veggies were mostly soft and a little roasted, but still had a bit of crisp in the middle. And the meat was still rare in the middle. I took them off and let them rest for a few minutes before pulling out the skewers and digging in.
Despite being older deer from the freezer, there was nothing but a delicious flavor from this recipe. The meat tasted like a rib eye cap, and was so tender you could cut it with your fork. Together with the spiciness of the green chilis and the mild sweet flavor of the onions it was the perfect treat after a long day in the woods. Give it a try and see for yourself. -CBM
There are few things more satisfying than eating a fine meal made from scratch in your home. For me it is even more savory when I include the tasty meats butchered from the animals we take from the nearby Rocky Mountains every fall. Today I wanted to share with you one of those dishes that is frequently enjoyed at my house, Tamales made from fresh venison. If you’re not familiar, the tamale is a Mexican classic meal that is made from a corn meal dough, and filled with various things but they should almost always they carry a spicy kick. This is my wife’s recipe, you can obviously alter it how you see fit, but this is how we do it at my house. This isn’t chump portions either, if your gonna go to all this work, you’ll want leftover tamales for days.
The Meat
We start out with a good portion of venison, usually two to four pounds. This is a great recipe to use those less desirable cuts that are often get left in the back of the freezer. You’ll need a crock pot (or equivalent slow cooking apparatus), place your venison in the pot, and add half of an onion, half of a bell pepper, and five garlic cloves. To that add a few bay leaves, oregano flakes, and a good touch of salt. Cover the meat with water or broth and let it cook for several hours until you can easily pull apart all the meat into a shredded tasty pile.
In a hot frying pan large enough to hold all the meat and then some, add some oil, the other half of an onion minced, a minced bell pepper, three minced garlic cloves, and one chopped tomato in that order. After about three minutes of these veggies frying in the oil you can add your drained meat from the crock pot, don’t worry too much about the liquid, it will cook off. Just don’t add so much that it is soupy. Season your meat with salt, pepper, cumin and a couple teaspoons of chicken or beef bouillon to taste.
The Chilis
Hopefully you’ve found the Hispanic isle in your local grocer, or a local Mexican market. You will need to have some New Mexico dried chilis (or equivalent), this is the kind we use :
Place the chilis in a bowl of water for them to soften up, and once they do you can put them in a blender together with two garlic cloves, a quarter onion and a pinch of salt. Add just enough water from the soaking bowl to properly blend the mixture into a sauce. You can strain the mixture into another container, or you can leave all those tasty bits in it. 1/3 of the mixture will be added to the frying pan to mix in with your venison, and the rest will be used in the masa (dough). The Masa
Using a four pound bag of Maseca corn flour, mix together the flour and 1.5 cups of vegetable shortening or even better pork lard. Add a touch of salt and two teaspoons of baking powder. You can then in a large bowl mix in the leftover chili mixture from the blender, it’s often easiest to mix with your hands instead of a power mixer. You can add warm water to the mixture as needed to help soften the lard and aid in the mixing process, mix it thoroughly until you have a creamy consistency that is soft enough to spread, but firm enough to stand in stiff points.
Corn Husks
The corn husks can also be found at the Hispanic market or isle, and they should be soaked in warm water until they are pliable and easily folded. Once they are ready, using a spoon or spatula you will want to spread the masa evenly in a basic rectangular shape onto the husks. This is where the artist in you will need to come out, there is a bit of a trick to getting the masa evenly spread and shaped on each individual cork husk. Avoid using husks that are too small, ripped or would otherwise allow your masa to seep out.
Filling
Realistically this is minimum two person operation, you can do it alone, but the work is better done in steps, one person spreading masa, and the other one filling and folding them. Using a spoon or fork you can add some of your meat mixture to the center of the masa, at our house we add some other goodies as well. Usually some potato strips (imagine basically a couple french-fries laying lengthwise in there) and a strip of pickled jalapeño, as well as a green olive or two.
Then its time to carefully fold the husks, closing the masa together very carefully. You essentially roll the husk, joining the two edges of the masa together. The husk should be in a very slightly tapered tube shape, and then you fold over the narrow end to keep the whole assembly from coming undone. You can stack them out as they are folded until you are done with them all, and it’s time to go into the pot.
Tamales are steamed to cook the masa. You ideally want a tamale pot, but not everybody is that dedicated so you may just have to steam them in a large pot with a double bottom. Ensure you have enough water in the bottom to steam the tamales for one to two hours until the masa is firm. Make sure the water does not reach the tamales, it will cause them to deteriorate, only the steam should reach them. Stack the tamales neatly in the steam-pot in such a way as to avoid the soft masa from spilling out.
The masa will become slightly more fluid as it is heated, but once cooked it will no longer flow. After an hour or so on the steam, you can pull one out to see if they are ready. Let it cool a bit, and see how firm they are. The masa should easily pull away from the husk, and keep its shape and contents intact. If everything looks good, you can pull the tamales from the steamer, and set them out to cool. They are excellent eaten fresh from the pot, or they are easily stored in bags in the freezer for eventual microwaving. This recipe renders us around 70 tamales.
Enjoy
Hopefully you are successful in your tamale making. Use great caution not to alter the recipe too much, I would hate for my wife’s dear departed Grandmother to look down upon your kitchen in horror as you mess up her recipe. And don’t let me catch you selling them in the Walmart parking lot either.
I’ve been lucky enough to see many other parts of the world we live in, and I love bringing back tasty meals from the places I’ve been. I think its a habit I inherited from my Mother and her travels.
On today’s menu is one of my favorite dishes from the beautiful country of Perú. Lomo Saltado is a dish made of beef, though alpaca is also a likely a popular substitute in some areas. My lovely wife decided she was going to to whip up a homemade version of my favorite Peruvian dish, and she knocked it out of the park. It all started with a a very tender pronghorn antelope loin (lomo in Spanish), this particular loin came from one of the antelope my wife shot herself last fall. It was her first time shooting a big game animal, and it was an exciting adventure for both of us, I’d recommend you click here to read that story.
Since taking her own game, and helping butcher it, she has taken great pride in cooking what she has killed. Making it into delicious meals for the family.
After thawing the antelope loin from the freezer, it was sliced into thin strips. The meat was placed in a bowl where it was marinated with a few ingredients, obviously salt and pepper to your liking, then a quarter cup or so of soy sauce, and an equal amount of oyster sauce. Follow that with a similar portion of your favorite oil, I like avocado oil but use whatever you like. The meat mixture is usually marinated overnight in the fridge until dinner time.
Fries or chips take a bit longer to make, so its probably a good idea to get your fries cooked before cooking the meat. White rice is also part of the dish, so you’ll want to have your rice ready by then as well.
Oil your frying pan, and add a course chopped red onion to the pan. Once the onion begins to turn translucent, its time to add the meat mixture and some minced garlic. On fairly high heat you want to brown the meat, and give it nice dark edges. Once the liquid reduces down a bit, your almost ready to serve, but first you’ll add your tomatoes. My wife used whole cherry tomatoes out of our garden, which was an amazing idea. I don’t like the tomatoes overcooked, so we add them right at the end to avoid them being completely reduced. And the whole cherry tomatoes held their beautiful shape and flavor all the way to the plate. You want to leave a bit of the sauce liquid at the bottom of the pan, it goes perfectly with the rice and fries.
Serve a compressed cup of rice turned over onto the plate, and top it with some chopped cilantro. Then you can add your fresh and hot fries, and top them with the meat mixture and a bit of the sauce from your pan. Make sure to top the whole thing with more fresh chopped cilantro.
This outstanding dish could be made with any red meat obviously, but the fact that it was made from antelope made it even better. Many people have a bad taste in their mouth when it comes to antelope, if you’d like some tips on overcoming that perspective, I’d recommend reading ‘Make that Slaughterhouse a Slaughter-home’ for some great ideas on ensuring your game tastes as good as it should. Thanks for reading along, hope you enjoy what you’ve killed as much as we do.
Many people wouldn’t even consider eating a mountain lion, whether because its a cat, or because its a predator, or many other reasons. I was eager to try it, as I’d heard wonderful things about it. So I decided to go all out, and made a cougar ham slow cooked in an Adobo sauce (made from various chili peppers, onions, garlic, and some spices). It turned out spectacular, like a pulled pork. Enjoy this Cooking Cougar Carnitas Adobado.
If you haven’t noticed yet, I love to eat. Nothing is more satisfying than a home-cooked meal made from ingredients procured by my own hands. Whether it’s tomatoes grown in the garden or a lean trimmed elk roast that I cut out by hand in a cold October garage.
One of the ways I maximize the flavor and the satisfaction that comes with it, is by home game processing my own animals. It started long ago, when as a child I watched my Father bring home deer to be butchered on the kitchen counter.
Many years later, more out of necessity than desire, I began carting my own deer carcasses into the kitchen. Being a bit of a germaphobe, as well as a bit picky at the table, I couldn’t fathom leaving the cleanliness of my food to the hands of some game processer. Just the look and smell of those outfits is enough to make me toss my lunch, so I was determined to do it all myself.
In the beginning, I’ll admit it wasn’t great, but I have become pretty good at it. I think its important to share a couple of the advantages that I have by doing it myself:
I am in complete control over what gets used and how. Being particular about my food, I like to know it was well cared for both before and after it was butchered. I always take great care of my animals, trying to get them gutted, cleaned and cooled as soon as possible. I have seen overwhelming evidence that the crucial time between death and the freezer has a huge impact on the flavor and quality of your meal. Once the carcass is cleaned, and cooled down, comes the aging. I think that aging the meat is very important, second only to the quick cleaning and cooling of it. Call me crazy, but I like to age my venison a minimum of four to five days. I actually wait until the first signs of decomposition start to show. When little specks of white mold start showing on the carcass, its time to start cutting. Much like a good piece of fruit, the best flavor comes right before it spoils. Obviously this must be done in a state of refrigeration, lucky for me, October temperatures here hover around freezing.
Not only does the flavor and texture of the meat improve, but its easier to handle and separate. Meat peels right from the bone, leaving a clean white surface. All the hard work of removing tendons and silver skin is also simplified, little to any coaxing is needed to fillet them right off of your favorite cuts. The meat itself takes on a softer, stickier texture, it almost feels greasy in a way, like near room temperature bacon. Another benefit of butchering my game at home, is the ability to cut the meat the way I want to cook it. I have recently explored many different bone-in cuts that not only increase the quality of my meats, but also cut down on waste. When cutting bone-in pieces, you get to eat all the meat in between the bones that is typically discarded.
Some of these great examples are cutting whole T-bone steaks. Since some deer aren’t that big, I actually cut them as Cross-bone steaks, basically, two T-bones that haven’t been split in the middle. I cut them about 1.5” thick, and sear them in a pan, till rare (120*) at the center near the bone. The only way to improve backstraps and tenderloins is to serve them together on the bone, with butter and rosemary.
Another great cut that I’ve tried is a bone-in Frenched rib rack. This is done by again leaving the backstraps attached, and sawing the backbone and ribs out. You can then either cut lengthwise down the back, splitting the two, or go really fancy and leave them whole.
Sawing the shanks is another great way to use bones that are almost always discarded. Cooked slowly the shanks are a very tender and tasty piece of meat.
I also like cutting out the meaty ribs of deer and elk. Cooking them twice, first in a pressure cooker, and then again in the oven. This melts off the undesirable fat from the ribs. I then season them a second time and slow cook them in the oven, it makes for an extremely soft and tasty meal.
All these custom cuts and preparations can be done at your own pace, and even cooked without having ever been frozen. I love a good fresh celebratory meal during the hunt.
I double wrap my meat in plastic and freezer paper, it keeps easily for years
I like to use a good fillet knife for processing my game. The flexible blade and the razor-sharp edge allow me to skin the dried rind off of most of my meat, exposing the perfectly aged and protected meat below. It also allows me to shave off any damaged parts, leaving as much meat as possible.
I start out with a sharp knife, and regularly sharpen it during the process, to keep the edge from dulling. The sharp blade easily separates broad tendons like those found on backstraps, just like skinning a fish fillet.
Many people grind a lot of their meat into burger. While I enjoy and love a good burger, I rarely grind mine until I’m ready to eat it. When I do, I use a LEM Big Bite grinder with excellent results.
Part of the reason I think so much meat is ground by so many, is because of the large scrap piles of meat that accumulate during the butchering process. I try and avoid this as best I can by keeping the meat in the largest pieces possible, and the scraps that I do get, I set aside for bottling.
Bottling venison is an often-overlooked process. I have had spectacular results putting my venison into jars instead of the freezer. A big benefit to this approach is no need to keep the meat frozen, and subsequently no loss should a freezer go down, or a power outage.
If those reasons aren’t enough, then the simple fact that it tastes so good should be enough. Bottled venison is extremely tender, and when bottled together with other ingredients like tomatoes, onions, or even a complete recipe, it is a whole meal ready to eat. One of my favorites is a simple chilli that consists of venison, tomatoes, roasted red or green peppers, onions, garlic, barley and black beans. Thrown together in a bottle with some salt, and cummin, it makes a delicious meal that requires nothing more than a source of heat to bring it to life.
Bottling meat is a slightly different process than you may be used to, do yourself a favor and look into it. It requires the use of a pressure canning pot.
When I do grind venison, I like to do it just before cooking. I also add in some pork fat, either straight fat, or fat with a little meat. This, as well as some good seasoning and some garlic and onions mixed into the burger will make one of the best hamburgers you will ever eat.
My “Meltdown Elk Burger” Elk patty with grilled jalapenos, bacon, horseradish Havarti cheese, grilled habanero onions, garden tomatoes, spicy pickles, lettuce and avocado.
I like to use good knives from Outdoor Edge to process my meat
Butchering an animal myself has led me to several practices while still on the mountain. One of them is a valiant effort to get the animal out whole if possible. Sometimes it is just too difficult, and an animal must be halved or quartered for extraction. I always prefer to get them out whole, this minimizes the amount of meat lost. For every cut that is made before the butcher table, there is meat lost. Whether it be from drying, contamination, or some other reason.
Keeping the animal whole keeps as much meat as possible protected from the elements.
Another field tactic that I use is the gutless extraction. Some of the places we hunt here in the Rockies are quite close to home. Almost every year, one or two of the deer or elk we kill, are close enough to home, that I can have them home, skinned, and washed out within thirty to forty minutes after the coup de gras is fired. That being the case, I will often leave the guts in the animal until we reach a vehicle. This avoids getting the chest cavity contaminated with dirt, leaves, or any other debris. The animal is then gutted, and transported home where it is skinned and washed in preparation for the aging process.
Another big lesson I have learned, for antelope, in particular, is to get as much blood out of the animal as you can. In my experience, one of the best practices is to take head shots. This leaves the circulatory system intact, allowing it to evacuate its volume even after brain-death has occurred. Obviously this practice is not recommended for an animal who’s head you intend to mount, or save. But for antlerless and meat hunts, it works great. Not only does it empty most of the blood via the headwound, but it does little to no damage to the eatin bits of the animal. And its much easier to gut and clean.
I cant believe how much venison I could have enjoyed so much more over the years, instead of suffering through it. It doesn’t take a huge amount of effort to put these things into practice, but it will make a night and day difference in how you enjoy all that beautiful game meat that you work so hard for. I hope these tips help make your meals better and more memorable, and please feel free to offer any tips you may have!