Preface
In another time of my life, it seemed popular for big outdoor names to offer everything from knives to cufflinks. Even as a child I figured out that some of these items were just rebranded Chinese junk. It seems many of the mighty have fallen these days, and their names sold time and again. Our subject today is the Winchester Supreme Optics 10×50 Binoculars, a competitively priced and quality built binocular. If your’e not sure what that has to do with my intro, let me clarify.

Sadly, the great Winchester name lost its place some time ago. The name suffered various changes of hands and its product lines were sold to different interests. Having once been a dominant firearms company, I was very sad to see this happen over the course of my life. But, Americans are good at comebacks…
Winchester Supreme Optics
Winchester Supreme Optics looks to bring back the quality and standard of the Winchester name. Our first look at these binoculars proved to impress me, so I am looking forward to seeing how the rest of their products perform.

Besides the binoculars tested here today, Winchester Supreme Optics also makes other binocular models as well as several rifle scopes, thermal optics as well as spotting scopes. I can assure you based on the binos in-hand, these are not some rebranded trash. It seems the new management at Winchester Supreme Optics has their eye on higher quality and more modern products.
Supreme 10×50 Binoculars
These Supreme binoculars are built on a robust thermoplastic body, with fully coated lenses and tactile grip exterior. The HD glass makes for sharp viewing with edge to edge clarity and brightening low-light images. The internal silver coated prism transmit light better and add contrast to the image. Of course it is nitrogen filled to prevent fogging and sealed to be impervious to the elements.

It also has the standard things you’d expect; tripod mounting lug, lens covers, lens cloth, sling attachments etc. It comes with a padded case and the typical padded sling to hang from your neck. As you might expect like with most binoculars, the sling and case would be set aside in favor of something more comfortable.
Specifications
| MAGNIFICATION | 10x |
| OBJECTIVE LENS DIAMETER | 50 mm |
| OCULAR LENS DIAMETER | 23.5 mm |
| TYPE OF PRISM | Roof / BaK4 |
| PRISM COATING | Silver |
| LENS COATING | WINcoat™ full multicoat |
| FOCUS SYSTEM | Central focus |
| EXIT PUPIL DIAMETER | 4.88 mm |
| EXIT PUPIL DISTANCE | 17 mm |
| FIELD OF VIEW (FOV) | 6.1° |
| FOV 1000 YARDS | 321 ft |
| FOV 1000 METERS | 107 m |
| CLOSE FOCUS MINIMUM | 3m / 10ft |
| DIOPTER SYSTEM | Right diopter ring |
| DIOPTER COMPENSATION | ±3 |
| INTERPUPILLARY DISTANCE | 57~72 mm |
| WEATHER PROOF | Yes |
| WATER PROOF | Yes |
| SUBMERSIBLE | 1m/15 minutes |
| NITROGEN FILLED | Yes |
| EYECUPS SYSTEM | Twist-up |
| CHASSIS MATERIAL | PPS |
| IP RATING | IPX7 (1m/30min) |

Fielding the Winchester Supreme Binoculars
Immediately after receiving the 10×50 binoculars, I went outside to begin evaluating them. I was greeted with a bright image, with clean edges and great contrast. Me and the boys in the office spend every fall hunting in these Rocky Mountains, all took turns looking around the neighborhood. My very first impression was very good, and the others also offered a positive impression.

One of my pet peeves about binoculars is the need to focus each individual barrel of the bino. I understand it is normal especially since not everyone’s eyes are the same. However I found that with these Supreme 10×50’s we spent very little time adjusting between users. It seemed as though the sweet spot focal-length was far more forgiving than other binoculars I’ve used. Even models that cost four or five times more than these.
Into the Mountains
With fall upon us, we took the Winchester Supreme binoculars into the mountains to do our typical scouting trips for mule deer and elk. The clean air at 9,000 feet looked spectacular through these binoculars. We glassed for hours inspecting every thicket and rock formation. I was impressed with how well these binoculars gave sharp focus at any realistic range.

Even in the early predawn light, I found the contrast of these binoculars to be great. Like those moments right at shooting light where you need to identify a shooter versus a non-shooter. The large 50mm objective does well at compressing the available light into a clean image with good depth. This allows you to properly identify your quarry.
Desert Heat
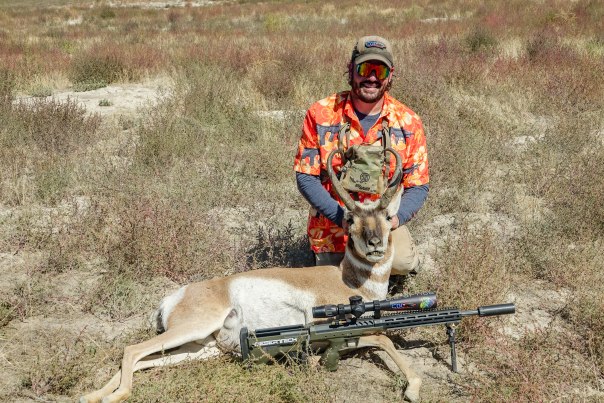
As summer nears its close, my son and I spent some time in the dry desert of the Great Basin. We would soon be chasing Pronghorn Antelope out here, and using the Supreme binoculars to inspect potential bucks would come in handy.
The yellowing landscape makes it feel warmer than it really is, and there is plenty of mirage to perceive. Again, the clear contrast of these binoculars made it an excellent tool as we scoured the desert looking for antelope.

Pros and Cons
I’ll start out with the positive aspects of these binoculars. First off I must say that for the price these are a great deal. Sub $200 binoculars are often trash-tier, like something you’d give your sticky fingered nephew for his birthday. I must say that for the $219 price of these binoculars they are fantastic. They also look sharp, avoiding the often cheesy look of lower priced products. The binos fit perfectly in both of my binocular harness’.

I already mentioned how I really like the ease of which they are focused, and the adjustable eye-cups make it quick to customize for each user. The optical performance is for sure the star of the show. Had I not been able to see the binoculars prior to looking through them, I would have expected them to cost double or more.
If I had to give these binoculars a demerit, it could only be their foreign manufacture. It’s a painful line to walk between inexpensive great products built overseas and more expensive ones made here at home. I must say, despite foreign manufacturing, they have upped their game significantly.

Final Thoughts
I have been very impressed with these Winchester Supreme Optics 10×50 binoculars over the last few weeks of glassing. And I would not have expected to so pleased with a pair of binoculars priced at only $219. My family and I look forward to putting these to some hard use during this hunting season. And I am pleased to see the Winchester name get back where it belongs, bringing quality products to American outdoorsmen. Stay tuned for more, as this wont be the last we hear of Winchester Supreme.
-CBM


 The ATN Binox uses an armored housing with a control pad on the top with various buttons to cycle through the menus and activate the different functions of the binoculars. At the rear of the binos you have an adjustable diopter to focus the image of the display inside. The front of the sensor lens can be rotated to focus the thermal image of the target, the right side is for the thermal sensor, the left side houses other sensors and needn’t be adjusted for image focusing.

 Much like properly viewing an ultrasound image, it seems there is a bit of a learning curve with looking at images like this. Oftentimes it is easy enough to make out trees, rocks and so forth. You can even make out sunny spots and shadows in the images taken during daylight. I have seen better imagery from other thermal units, but to be fair they cost significantly more than this one.