Who doesn’t get just a little sad when hunting season is over? Springtime for me can be somewhat depressing, perhaps its the colorless and winter torn look of the high-country I love to play in. But spring also is a new beginning of a whole new type of activities, as it begins to warm up and green begins flourish through the hills, there is still much to do. And I love spending time out in the wilderness. This is a video I did with the folks at Recoil, in the video we go into some of the fun and challenging activities that can still keep you on your toes until hunting season is back.
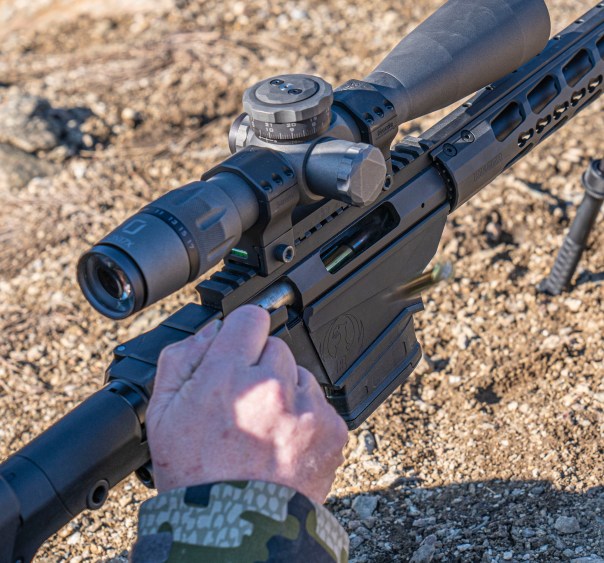
The Ruger Precision rifle 6.5 Creedmoortook the precision rifle world for quite a ride when it first came out. Ruger made an excellent move by introducing an affordable rifle into an arena that was dominated by expensive custom-built rifles and actual sniper rifles. And in another stroke of genius they managed to make a rifle that appealed to the AR-15 crowd at the same time, which brought even more customers into their fold.
The RPR
The Ruger Precision Rifle utilizes a bolt action receiver that is built into a chassis. It is fed by SR-25 pattern 308 sized P-mags for the 308, 6mm, and 6.5 chambered rifles. This rifle seems to almost clone the aesthetics of the extremely popular AR 15. Using the same pistol grip, and similar operation for the safety. Today’s test model also includes a folding butt stock for shortening the footprint of the rifle when transporting.
A twenty-four inch hammer forged barrel uses 5R rifling which if you ask the internet is the only good kind of rifling. Long-range shooters prefer things like the one-in-eight twist barrel as it is ideal for launching the heavy for caliber bullets. Weighing in at ten and a half pounds, the rifle is about forty-five inches long unless you fold it, in which case it is thirty-five inches long.
Having been one of those in the community with a preference for the custom built rifle, it took me some time to actually give the Ruger a try. To be honest I did look down at it a bit, perhaps like many others I was angry that it shot just as good as rifles that cost twice as much or more.
But it didn’t take long for the RPR to prove its worth to those in the community, and now a days its common to see them shooting at top PRS events. I shot in the Hornady Precision Rifle Challenge this past summer. There we saw several RPR’s including Doug Koenig who did extremely well shooting with significantly more expensive competitors, taking home the top Production Rifle trophy.
After all this time I figured it was time for me to open up to the Ruger, so I took the opportunity when it came. Opening up the box, I found the all black rifle complete with a magazine, bipod and a few other items. It took a few minutes to familiarize myself with the rifle, and get a feel for the controls and such. For me there are couple things that stand out when first handling a rifle, the first one is throwing the bolt. Quickly I shouldered the rifle and ran the bolt a few times, you can tell a lot about a rifle by the feel of the bolt-throw.
More Ruger Precision Rifle features
Bolt manipulation of the Ruger Precision Rifle was smooth and had a positive lockup feel when closed into battery. You could also feel a metal on plastic sensation a little bit which I assumed to be the piece at the rear of the bolt. Not that there was anything negative about it, as plastic on metal frequently gives a low-friction feeling which I do like. Bolt lift was not bad, but did take a little bit of getting used to. Not bad, obviously not as good as some of the other rifle actions frequently used today.
Among the features that seal the deal for me is the trigger pull. While I don’t consider myself a trigger snob, I do enjoy a perfect trigger whenever I can. Ruger’s trigger on the RPR was a good one, clean and without the abrasive skipping often felt on triggers of lower tiered firearms. I’ve never been a big fan of blade safeties. When they first came out many years ago, the first thing I did was figure out how to remove them. That being said I wasn’t so hateful of this one to look for a way to remove it.
The main safety was in the same place your traditional AR style rifle safety goes, which made it very convenient and familiar to use. It wouldn’t hurt my feelings if they put it on both sides like AR’s often do, but certainly not a deal breaker.
This RPR runs on 308 sized P-Mags, and it came with a ten-round magazine. After some range time I would try the twenty-round ones as well, just in case you ever needed to do some long strings of fire.
Including a folding buttstock of the rifle made it much shorter for transportation, and doubled as a quick way to remove the bolt for inspection, lube, or cleaning. Up front we had the hammer-forged twenty-four inch barrel inside a free-floated handguard. Cut into the muzzle of the barrel are 5/8-24 threads. Which was great because I planned on mounting some stuff there.
The handguard on my particular rifle uses KeyMod for accessory attachment. But they are also available in the more modern and useful M-Lok. I secured the Atlas bipod to the pic rail underneath, and then I was ready to mount up a riflescope. Continue Reading Here…
A good rifle deserves an even better scope, like the US Optics FDN17x
FIRST SHOTS
Running the bolt forward on a cartridge felt smooth and controlled. I could often feel the slightest bind as the bolt closed the last few degrees. Almost like the extractor was having trouble snapping over the cartridge rims. As I brought the reticle to rest on my point of aim, I took up the slack in the trigger and gave it a steady press.
Repeating the process another four times and made a nice little vertically strung group. I have noticed this tendency during this cold time of year. Particularly when both rifle and ammo are below freezing temperatures.
As the bore warms and each round is chambered into a progressively warmer chamber. Velocity increases slightly and brings the point of impact up a touch with each shot. Horizontal dispersion was minimal, and the overall group size was just under an inch.
That’s not too shabby using what most would consider plinking ammo, and the results were even better when shooting 140-grain match ammunition. I pushed the RPR out to half a mile to see how it performed. As I suspected, it was easy impacts. Recoil on the rifle wasn’t terrible, allowing me to spot my impacts at those extended ranges.
Shooting this rifle go without seeing how it does with a suppressor wasn’t an option to me. To that end, I pulled out my Yankee Hill Machine Nitro N20 suppressor. During my range time I noticed only a small change in point of impact. Likely due to the light weight of the Nitro.
It was beautiful to shoot in the open country of the mountains and listen to the long journey of the bullets. They hissed through the sky before they thumped into the target. I think the RPR deserves a good suppressor, it makes a great little rifle even better.
POSSIBLE DOWNSIDES?
At first, I wondered why they made it a 24-inch barrel versus a 26-inch barrel. After running around with this thing, I understand why. If I had the ability to order the RPR from the factory, I would have done so with a shorter barrel length that was more like 20 inches.
rifle details; notice QD sling cup behind the grip, and locking mechanism for folding stock just above it
Adding a folding stock is great for reducing the length of the rifle, at least when you are trying to transport it. But another one of my complaints has to do with the folding mechanism, mainly that it only locks in the shooting position.
While it’s not a deal-breaker for me, it would be really easy to get something pinched in the pivot point. Especially when the stock inevitably comes swinging back as you try and maneuver it.
The magazine release was also a touch tough for my taste. It was easy to falsely engage the magazine on this rifle to where it looked like it was in. Making you think it was secure, but was not really secured.
Ruger’s magazine release also seemed to require a touch more force than I would expect for such a simple and common motion. This is likely something that can be adjusted or corrected by the user, so don’t worry too much about it.
MY CONCLUSION
As I suspected, the RugerPrecision Rifle 6.5 Creedmoor is just what I thought it would be – a great-shooting production rifle with an entry-level price tag but professional results. Sure, it’s not as nice as the custom precision rifles out there.
And you can feel that it has been mass-produced. But nonetheless, the rifle performs very well in its capacity. It gives the user accurate shots, a familiar manual of arms, and pleasing aesthetics.
Above and beyond that, there are countless ways to customize and improve the rifle with excellent aftermarket support. I have some nice rifles in my safe. I wouldn’t trade any of them for a Ruger RPR, but I wouldn’t mind having a couple RPRs in the safe to give them company.
-CBM
The Atlas bipod makes an excellent addition to the rifle
If you were around back when the various SASS rifles hit the market, you may remember it was an exciting time for those of us who love precision shooting auto-loaders. It seemed like everybody made their submissions for the project, but not all of them were destined for adoption. Lucky for enthusiasts like myself, these rifles made their way into the commercial market where hungry aficionados waited for just such an opportunity. The REPR (Rapid Engagement Precision Rifle) from LWRC was one of those rifles, and many were the nights I creeped the internet forums and webpages longing for a REPR. The ebb and flow of life wouldn’t deign me the capital to buy such a gem for my modest collection, but life’s current has brought the white whale back into port.
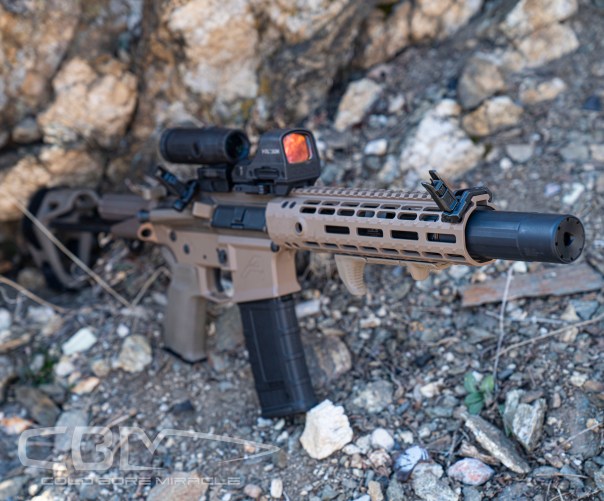
The LWRC REPR
The REPR is a semi-automatic precision rifle chambered in 7.62X51, it is of obvious AR heritage and yet distinctively it stands alone. The REPR functions near the same as every other AR style rifle except for it’s short stroke gas piston operation and side charging handle. The controls of the rifle closely mimic everything you already know as far as mag release, bolt catch, safety, etc.
The REPR features a non-reciprocating side charging handle on the weak side of the rifle, as well as an ambidextrous bolt-catch that can be operated with either hand. The rifle is available in a few different barrel lengths, but this one is a twenty-inch barrel with a one-in-ten twist. At the loud end of the rifle you will find a two position gas block with a setting for normal and suppressed, something I intended to test thoroughly. The 5/8-24 threaded muzzle came with LWRC’s Ultra muzzle brake that uses three horizontal ports on each side to vent gas pressure and reduce recoil. The handguard features screw holes to attach an assortment of picatinny rails wherever you might need them, as long as it’s three, six, nine, and twelve o’clock. The REPR comes with factory Magpul furniture. The MOE grip and PRS buttstock make an excellent interface with the triggerman, and are easily adjusted. Last but certainly not least, the rifle comes from the factory with a Geissele® SSA-E 2-Stage Precision Trigger which together with all the above mentioned features makes this rifle smooth and sexy without losing its sturdy and potent performance.
REPRoducing my dream
Its not often I go twenty-four hours without shooting a new gun, and I dang sure wasn’t going to break that tradition with this beauty. I spent a great deal of time playing with it, getting familiar with its differences and similarities. With a Leupold CQBSS 1-8 scope mounted in a Larue SPR mount, I grabbed some ammo and my tool kit and made my way to the cold and snowy mountains nearby.
Once there, I installed a bipod for some supported shooting while I zeroed the rifle. The ammo I started with was Hornady 155-grain match ammunition, True Velocity 168-grain Match, Underwood .308 Controlled Chaos, and finally some Desert Tech 175-grain Match. I have used all of these in other 1:10 twist rifles, so I expected it would do the same here.
Testing at 100 yards showed the 155-grain ammo to be the best choice, but the 175-grain would be the better performer at the significant distances I intended to reach. Accuracy for the Hornady ammo was around 1 MOA on average, while the Desert Tech load produced more along a 1.2-MOA average.
In outward appearances and functions, the REPR offers an an AR-style package
It could be that my shoulder wasn’t feeling it that day and shot the lighter recoiling ammo better. The .308 Win is not known for its high velocity, but I have used it for nearly my entire shooting career to distances many would consider irrational.
With the rifle zeroed and accuracy established, I immediately succumbed to my desire to stretch every rifle I ever shoot to as far as it will reasonably go. I picked out the exposed tips of stones protruding from the snow on the opposite side of the canyon for targets. The puff of rock and vaporized bullet are easily seen, and, if you miss, you can see it in the snow.
I pushed the REPR out to 1000 yards, which is arguably about as far as I ever really need to shoot. Repeated, easy hits between 400 and 800 yards gave me great confidence in my abilities behind the rifle, it just begged to be shot more.
A typical group from the REPR. I believe the vertical stringing was caused from shooting the sub-freezing rifle and gaining velocity as it warmed up
IT’S HEATING UP AND SHOOTING SUPPRESSED
I also removed the muzzle brake to see how the rifle shot with a suppressor installed. Using primarily my Yankee Hill Machine R9, along with a few other cans I had laying around, I fired the rifle to see how the reduced gas setting would affect its cycling. The various suppressors did cause differing back pressures and feels, but they were all acceptable as a general observation. The accuracy seemed to tighten up a little bit with the suppressors, be it the additional weight added to the platform or a cleaner release of the bullet from the muzzle, and the rifle shot even better.
The rifle boasts a two-position gas block to help run a suppressor
The groups actually tightened up while shooting the REPR suppressed
This anomaly was also accompanied by some additional recoil. Whether it was the lack of the muzzle-brake or the added gas pressure from the suppressor, the rifle seemed to jump a bit more. It also could be a combination of the two. Either way, I think the REPR could benefit from one more setting on the gas valve with just a touch less gas pressure.
ALL THINGS CONSIDERED
Here you can see the two-position gas block, not to mention the fine machining work on the rifle
Evaluating the REPR for exactly what it was built for brings us back to the Army’s Compact Semi-Automatic Sniper System program, which was meant to refine the semi-auto sniper rifle into something more compact, light, and lethal. It also had to do this without standing out too much from the other rifles in use. As tested, this rifle comes in at just under 10.5 pounds naked, which isn’t exactly light. But with the shorter-barreled version of the rifle, you can get the weight down to 9 pounds or less. These shorter barrels will obviously make it more compact and easier to maneuver as well.
The REPR meets those requirements very well, and the civilian market isn’t nearly as rigid as Uncle Sam. The rifle is very well built, and the intricate machine work and innovative designs are sure signs of outstanding American craftsmanship. The smooth operation of the action is extremely satisfying, as is the crisp break of the trigger. Little touches, like a built-in anti-wobble pin to keep the lower and upper receiver snug and high-quality coatings of both internal and exterior surfaces are certainly doing their part to justify this rifle’s starting price of $4,233.
Since this is an evaluation, I’d be careless to not include my negative marks for those looking to knit pick. The 20-inch version of this rifle isn’t light, and most of the weight is way out front. I think I might have liked the 16-inch version a little more, but obviously this point is for each to decide.
The machine work on the receivers is immaculate, but I did find that the aluminum bosses surrounding some of the controls can inhibit good purchase. The mag release and bolt releases seem to be somewhat protected by the receiver. This may just be a reconditioning of the fingers, but I found that I’d frequently miss when blindly stabbing at the controls.
Lastly, I don’t consider myself a trigger snob, but I did find myself wanting to polish the first stage of the Geissele trigger. It wasn’t bad, but I could frequently feel a couple of steps of movement before hitting the second stage. This was a minimal issue for me, and certainly didn’t inhibit the hits from coming downrange, but I thought I’d mention it.
The LWRCI REPR is everything I dreamed about years ago. Only you can decide if it’s worth the price for your purposes. I think it is an outstanding rifle for anyone who wants to put heavy .308-sized hits on many targets at various ranges quickly. Or, if you just want a bunch of holes in something, it fulfills that purpose, too. High-quality American-made performance is what you can expect from the REPR. I’m happy I finally landed my white whale. Now if only I could afford to keep it.
Many years and mistakes ago, I found myself at a local sporting goods store. Nothing fancy at all, it was basically like a K-Mart where they sold Mossbergs, baseball gloves, and golf club sets. Being a complete novice in the shooting arts at the time, I peered covetously over the collection of boring-ass three-hundred-dollar production rifles on the shelves. If only I’d known back then what a collection of amazing rifles I would one day enjoy.
Among all the cheap pocket knives and leather slings hanging on the shelves, I noticed a strange apparatus called a “bore-sighting-tool.” I had no idea what it was, it appeared to have some sort of lens in it, so I assumed it had something to do with sighting in a rifle.
Fast forward a few years, and I had learned a bit more about rifles, shooting and everything involved in it. I was still what I considered a novice at the time, and I was out shooting with my Grandfather. While trying to zero a scope, Grandpa explained to me the way he used to sight in his Howitzer back in the war between Korea’s. Using a distant point, preferably a star Grandpa said, he would center the point in the middle of his 105mm bore. Once it was centered, he could adjust the sight to the same point of aim, and that would give a good starting point to work from. This lesson stuck with me ever since, it was easily digested by my Neanderthal brain.
The first thing you will need to do is find a VERY stable position to set your rifle up, and remove the bolt. I usually use a good bipod on the front and either sandbags or a good shooting rest or monopod on the back. Whatever you use, make sure that the rifle is as stable as possible with no movement (perhaps even in a vise if you have the option). The bench at the rifle range works great if you have everything you need to keep it stable. You’ll want to set the rifle up so that the bore of the rifle is looking at your point of focus, that might be the bullseye of your target, or a distant rock or tree on a hillside.
Adjust your sandbags or whatever you are using, so that your focal point is perfectly centered in your rifle-bore. The key is to get it as centered as possible, that means you want your eye perfectly positioned behind the rifle’s bore. The easiest way to confirm that is by moving your head up and down, and side to side until you find that perfect spot where the breach, bore, and muzzle of the rifle are all concentric with each other.
Looking straight down the bore from the breech end of the rifle
They should look like a circle, centered in another circle, centered in yet another circle. And when you have that figured out, adjust your rifle until your point is as close to the center of the rifle’s bore as possible. Once you have it set, double check a few times and make sure it’s perfect. The next step is to adjust the turrets of your rifle scope to center the reticle on the same exact focal point.
If you your turrets are capped, it would be best to de-cap the turrets prior to this point to minimize movement of the rifle, and now you can see why you want the rifle as solid as possible prior to starting. If the movement of the turrets shifts the rifle in anyway, you’ll have to start over again.
Carefully adjust the reticle to your focal point, and double check your bore to ensure that it still remains centered. Once you have both your reticle and bore centered on the same distant point, you are ready to put your bolt back in, and start shooting. Sometimes the point of impact is near perfect, and other times it may take a few shots to perfect your zero. But you will definitely be on a sheet of paper if you’ve done it right.
I’ve done it this way for decades now, and it has never failed me yet. I can usually take a new rifle and scope to the range and within as little as two or three shots have a solid zero. I never actually used one of the bore-sighting tools that I used to see in the stores, and I certainly don’t need to spend money on one.
Good Luck
This of course is not the only way to do it, and perhaps not even the best, but it works. Hopefully you’ll find this practice as useful as I have, and with any luck you will get it right the first time. But if not, just keep trying until you get the hang of it. -CBM
There are few things more satisfying than eating a fine meal made from scratch in your home. For me it is even more savory when I include the tasty meats butchered from the animals we take from the nearby Rocky Mountains every fall. Today I wanted to share with you one of those dishes that is frequently enjoyed at my house, Tamales made from fresh venison. If you’re not familiar, the tamale is a Mexican classic meal that is made from a corn meal dough, and filled with various things but they should almost always they carry a spicy kick. This is my wife’s recipe, you can obviously alter it how you see fit, but this is how we do it at my house. This isn’t chump portions either, if your gonna go to all this work, you’ll want leftover tamales for days.
The Meat
We start out with a good portion of venison, usually two to four pounds. This is a great recipe to use those less desirable cuts that are often get left in the back of the freezer. You’ll need a crock pot (or equivalent slow cooking apparatus), place your venison in the pot, and add half of an onion, half of a bell pepper, and five garlic cloves. To that add a few bay leaves, oregano flakes, and a good touch of salt. Cover the meat with water or broth and let it cook for several hours until you can easily pull apart all the meat into a shredded tasty pile.
In a hot frying pan large enough to hold all the meat and then some, add some oil, the other half of an onion minced, a minced bell pepper, three minced garlic cloves, and one chopped tomato in that order. After about three minutes of these veggies frying in the oil you can add your drained meat from the crock pot, don’t worry too much about the liquid, it will cook off. Just don’t add so much that it is soupy. Season your meat with salt, pepper, cumin and a couple teaspoons of chicken or beef bouillon to taste.
The Chilis
Hopefully you’ve found the Hispanic isle in your local grocer, or a local Mexican market. You will need to have some New Mexico dried chilis (or equivalent), this is the kind we use :
Place the chilis in a bowl of water for them to soften up, and once they do you can put them in a blender together with two garlic cloves, a quarter onion and a pinch of salt. Add just enough water from the soaking bowl to properly blend the mixture into a sauce. You can strain the mixture into another container, or you can leave all those tasty bits in it. 1/3 of the mixture will be added to the frying pan to mix in with your venison, and the rest will be used in the masa (dough). The Masa
Using a four pound bag of Maseca corn flour, mix together the flour and 1.5 cups of vegetable shortening or even better pork lard. Add a touch of salt and two teaspoons of baking powder. You can then in a large bowl mix in the leftover chili mixture from the blender, it’s often easiest to mix with your hands instead of a power mixer. You can add warm water to the mixture as needed to help soften the lard and aid in the mixing process, mix it thoroughly until you have a creamy consistency that is soft enough to spread, but firm enough to stand in stiff points.
Corn Husks
The corn husks can also be found at the Hispanic market or isle, and they should be soaked in warm water until they are pliable and easily folded. Once they are ready, using a spoon or spatula you will want to spread the masa evenly in a basic rectangular shape onto the husks. This is where the artist in you will need to come out, there is a bit of a trick to getting the masa evenly spread and shaped on each individual cork husk. Avoid using husks that are too small, ripped or would otherwise allow your masa to seep out.
Filling
Realistically this is minimum two person operation, you can do it alone, but the work is better done in steps, one person spreading masa, and the other one filling and folding them. Using a spoon or fork you can add some of your meat mixture to the center of the masa, at our house we add some other goodies as well. Usually some potato strips (imagine basically a couple french-fries laying lengthwise in there) and a strip of pickled jalapeño, as well as a green olive or two.
Then its time to carefully fold the husks, closing the masa together very carefully. You essentially roll the husk, joining the two edges of the masa together. The husk should be in a very slightly tapered tube shape, and then you fold over the narrow end to keep the whole assembly from coming undone. You can stack them out as they are folded until you are done with them all, and it’s time to go into the pot.
Tamales are steamed to cook the masa. You ideally want a tamale pot, but not everybody is that dedicated so you may just have to steam them in a large pot with a double bottom. Ensure you have enough water in the bottom to steam the tamales for one to two hours until the masa is firm. Make sure the water does not reach the tamales, it will cause them to deteriorate, only the steam should reach them. Stack the tamales neatly in the steam-pot in such a way as to avoid the soft masa from spilling out.
The masa will become slightly more fluid as it is heated, but once cooked it will no longer flow. After an hour or so on the steam, you can pull one out to see if they are ready. Let it cool a bit, and see how firm they are. The masa should easily pull away from the husk, and keep its shape and contents intact. If everything looks good, you can pull the tamales from the steamer, and set them out to cool. They are excellent eaten fresh from the pot, or they are easily stored in bags in the freezer for eventual microwaving. This recipe renders us around 70 tamales.
Enjoy
Hopefully you are successful in your tamale making. Use great caution not to alter the recipe too much, I would hate for my wife’s dear departed Grandmother to look down upon your kitchen in horror as you mess up her recipe. And don’t let me catch you selling them in the Walmart parking lot either.
In the search for a very small and useful rifle, my brother put together a 300 Blackout pistol. Though a deeply committed rifle junkie, I’m not exactly a huge Blackout proponent but I can surely see what the appeal is. One thing I do know for sure, is that unless you are going to run it suppressed, you are leaving most of the Blackout’s magic on the table. That is where todays subject comes in, the Sandman Kwas selected to go with this little project, and today we’ll take a look at how it performed the task.
The Sandman
The name suggests a peaceful slumber, I interpret that to mean the Sandman at a minimum won’t cause a huge disturbing raucous. Which is exactly what the Blackout was meant to avoid.
The Sandman family of suppressors was meant to provide heavy duty service to shooters who prefer suppressed fire. Dead Air claims the Stellite and stainless construction are among the most durable materials used in the suppressor market today. The suppressor is five and a half inches long, and weighs in at just under thirteen ounces. The Sandman has a thirty-caliber bore rated for cartridges up to 300 Winchester Magnum, and it also has available end caps with 5.56 and 6.5 bores. The Sandman mounts to Dead Air’s QD nitrided muzzle devices, they boast single-hand installation and removal that is simple and fast. All this comes with a Cerakote finish for a handsome and durable service life.
Installation
Once the Blackout pistol had been finished, it was time to install the KeyMount muzzle brake. This was a little bit of a challenge because the barrel was recessed inside the handguard, and to be sure it stayed there a serious thread-locking plan was undertaken. The KeyMount design is easy to understand, but I have had a couple issues with it. It uses a three lug ratchet cap that aligns with the muzzle device, and once pushed all the way down to the seat you can twist the suppressor a couple times tightening up the entire assembly on a tapered shoulder.
I say problems, but really it was just a lack of training or getting used to the function of the Sandman. Getting the lugs lined up properly can take a few tries at first, much like a USB you have to try it the same way a couple times to get it right. Once the can is locked up though, it is solid as can be. The system is indeed quick, and strong which explains why so many have switched to it. One thing I did find, which I think can happen with many of these QD type suppressor mounts is they get quite tight to the mount at times. Particularly when whoever installed it did so with significant exertion, the suppressor can be a bit of a chore to break loose and even more so if it has been on the host for a significant period of shooting and time.
One of the great benefits of this system and again what has made it so popular and prolific is the ability to switch the suppressor between hosts quickly and easily. Having extra muzzle devices can give you a great many options for using the Sandman and others that utilize the same mounting system.
On the Range
Once the K-Man was mounted, we set to test firing the host, and adjusting the gas system for optimal operation. As you might expect from a can this small, there was a little more noise than I was used to for suppressed fire. I also noticed a fairly prominent first round pop, with an accompanying flash. Super-sonic shooting with the Sandman K was definitely louder than what I am used to, but again that is a normal and expected occurrence for a suppressor this short. K cans are typically used for different situations where maximum suppression is not the main goal of the suppressor. They are more just to take the edge off for shooting inside buildings or similar situations where massive muzzle blasts are particularly unwelcome.
Sub-sonic shooting on the other hand is much more tolerable, and the real reason the blackout shines. Sub-sonic ammunition doesn’t have the noise associated with bullets breaking the sound barrier, and the Sandman K does just enough to break up the noise produced by the muzzle-blast to make it very pleasant to shoot. And it does it while adding as little as possible to the length of the host firearm.
The Blackout and Sandman combo turned out to be a excellent pairing. Much better I think than had we run the K on a regular centerfire rifle such as a 308 or something similar. While it of course would provide some suppression, it would certainly not be hearing safe. To be fair very few suppressors are hearing “safe”, but my personal position is; I don’t collect stamps and pay money to continue using ear plugs. So for me the Sandman K is going to stick with subsonic hosts, or at a minimum with diminutive cartridges.
There are so many excellent suppressors on the market today, but some I feel are better for niche uses. Would I recommend the Sandman K for a first time suppressor purchaser? Absolutely not. The S or L model on the other hand would be an excellent choice.
But if you are knee deep in stamps and trusts, there’s nothing wrong with having a few dedicated cans for very specific purposes or hosts. For that purpose I think the Sandman K is a bulletproof option, it is neither the first and certainly wont be the last can purchased for a calculated purpose around here. As for the little Blackout, it does its thing real quiet now.
There comes a time in a guys life, where he has to choose between a couple different ways of living. Whether its gym membership or a hiking regiment we make choices that effect our future activities. While many of these choices are about the mundane and everyday tasks we engage in, some of them can be life-changing, like whether we carry a gun, or a pocketknife.
You clicked on a backpack article right? Well the Eberlestock Cherry Bomb is in fact the subject of this article, but we are going to talk about how a backpack choice can effect your life.
Eberlestock is well known for making top-quality backpacks and other outdoor gear. While their products are probably most popular among outdoor types like hunters and backcountry hikers, they are also quite popular with just plain gun folk. I first heard of them years ago when my brother bought one of their Gunslinger backpacks, so when the time came for this project, my eyes turned toward Eberlestock.
Carrying a gun is a big deal that hopefully everybody takes with extreme responsibility, but there are many who take it to the next level. Your reasons might be professional such as public service or private security, or you might just work in the firearms industry or play with a lot of guns. On a day to day basis, a person not unlike myself might usually have a pistol and a rifle or two. One of those weapons should be ready to party at any given minute, and as a superior option to a handgun I would prefer the rifle. I wanted to see if the Cherry Bomb pack from Eberlestock would be suitable for an every-day carry backpack.
Having a rifle close and ready can certainly provide you with the upper hand should you need it, so after doing some measuring and research I decided to get a Cherry Bomb for my Desert Tech MDRX Micron.
The Cherry Bomb
The Cherry Bomb is a multiple compartment backpack that could easily be mistaken for a nice laptop carrier. It has an internal space of twenty-four inches by eleven inches wide, and has several dividers for storing assorted organized “things” inside. The pack comes with a removable waist-belt should you choose to use it, and it is available in a few different color schemes which don’t scream “Gun Inside”. The shoulder-straps are well padded and adjustable to fit most anyone, I chose to remove the waist-belt mainly because I don’t need it for carrying it on a daily routine.
Like all Eberlestock packs it is extremely well built, strong stitching and tough seams and zippers make it very robust and reliable to open and keep closed. There are two small zippered compartments at the bottom on each side, as well as a cunningly placed rainfly stowed in the very bottom. The interior of the pack has several dividers for keeping things like laptops from getting rubbed against your rifle. It also has some internal pockets for keeping small things like those you’d keep in your pants-pocket, but you have a backpack now. Next to the rigid weapon compartment there are also two pockets that are just right for holding extra magazines, complete with bungee retention.
The Grey man
I wont bore you with the grey man theory but to mention that the Cherry Bomb is a good start to your grey man kit. As I mentioned above it could easily be mistaken for a computer carrier or biking backpack. Carrying a concealed rifle around is easy with this pack, and you can do it with comfort and without attracting attention.
Stowing my rifle
Opening up the Cherry Bomb for the first time, I was excited to see if my measurements had been correct. I had my short-barreled MDRX ready to load up, and I was excited to see that not only would the rifle fit, but even with a shorty suppressor installed I could just squeeze it in. With a low profile red dot installed on the rifle, and a loaded 20 round magazine, the MDRX Micron SBR dropped right in. I stuck two additional thirty-round magazinesinto the pockets, as well as some other things that go well with a little rifle and zipped it up. The pack features zipper pull-tabs, and they are built well just like everything else. I zipped them both up to the middle-top of the pack, and decided to go for a walk. With a couple water bottles added to the outer pocket, I figure it probably weighed around fifteen pounds with all my gear comfortably stowed. The Cherry Bomb could easily carry much more weight comfortably, especially if you use the waist belt. Using only the shoulder straps for support I found it to be quite tolerable, and without the waist-belt it was still easy to maneuver and quickly remove the pack.
Just as important, I wanted to see how quickly I could pull my rifle from the bag, and be ready to shoot should such a need arise.
With both zipper-pulls at the top, I found it easy to “peel” the pack open like a banana, and the rifle was easily extracted by either pulling at the butt-hook of the stock, or just grabbing the sling and pulling it out. I also tried slinging the pack off of the shoulders and around the front using the waist-belt to keep my entire kit attached, which also worked out as a suitable option. After a little practice, either way I did it made for a fairly quick deployment. This is where the benefits of the bullpup MDRX were most apparent, most AR15 and similar SBR’s need either a folding stock, or be of the collapsible type. This requires an additional step upon removing the rifle from the bag, but my little Micron is ready to go with a slap of the charging handles as soon as its free.
The Cherry Bomb (center bottom) is a perfect fit for stashing your SBR
The Cherry bomb quickly became a briefcase for me, traveling to and from the office with me every day. Easily stored documents and other everyday items were also stashed inside. To be completely honest, it almost seemed like a little bit of light duty for the Cherry Bomb. But the opportunity to put it into another role would soon arrive.
The Hunt
With the local deer and elk hunts inbound, I saw the opportunity to test a couple things using the Cherry Bomb. I have backpacks all over, but my wife would be coming along on this hunting trip as well. I figured the comfy straps of the little Eberlestock might make her day a little more pleasant. So as opening day arrived, I cinched the shoulder straps way down to fit her petite shoulders and replaced the waist belt. We were only planning on being out for the day, with hopes of getting our hands on an elk. But because anything can happen, she loaded up the Cherry Bomb with all kinds of gear.
She wanted her thermos of hot tea, water bottles, plenty of snacks, extra jacket, knives, ammo for her rifle, and of course an emergency shit-kit and so on. All the things she thought we may need fit snugly into the little pack, and she slung her rifle over the shoulder strap.
Its a good thing she went prepared that morning, as she was seconds away from plugging her first elk. But instead we ended up packing out a deer, and by the time we made it back to the vehicles we had exhausted the snacks, water, and even the tea. They were replaced by a rifle and some backstraps. All the while I kept asking her how she liked the pack, and if she was comfortable. It was quite apparent from her attitude that the pack was indeed comfortable, and I had to wrestle it from her the following weekend to take it hunting myself.
Results
Part of the reason I went with the Eberlestock from the beginning was because I was confident I would like it. With their well known reputation for quality, my assumption that they would think it through was correct. The Cherry Bomb is an excellent backpack, whether you are using it to stow your daily rifle, as something to carry your daily effects to work, or to haul pieces of game from the bottom of a steep canyon draw. It’s adaptability to a variety of uses is perhaps it’s strongest point. I love carrying it wherever I go, knowing that readiness waits inside the Cherry Bomb.
Life is so much better with a suppressor, and the more suppressors you have the better in my opinion. Suppressed shooting brings a new level of enjoyment to the shooting sports, whether it be hearing your bullets impact on the target or just not having to wear ear protection and being able to speak with each other without yelling. Rimfire’s are already quiet compared to their centerfire counterparts, and when you put a suppressor on them they are even more quiet. The Dead Air Mask 22 rimfire suppressor has been in my inventory for over a year now, and I can certainly say it has made the year more pleasant. And if you are looking for one yourself, I’m here to give you my opinion on it.
The Mask
The Dead Air Mask is titanium and stainless steel rimfire suppressor, it is rated for everything from 22LR up to 5.7×28 cartridges. It is just over five inches long, and has a diameter of 1.070 inches and weighs in at 6.6 ounces. The Mask is disassembled using the provided tool for the muzzle cap, and the threaded breach of the can also threads out making cleaning the suppressor very easy.
All Season
The Mask has been with me for some time now, through the summer heat and the cold of winter. I think I’ve gotten a good handle on how it performs.
The Mask was easily installed on an assortment of host rimfire weapons, and in every instance it made everything better. I use my firearms mostly for hunting and practice prior to hunting. A good portion of the summer time was spent using the mask on several 22 pistols to hunt small game such as squirrels and marmots.
Using suppressed rimfire hosts can get you up close, the Taurus TX22 was another excellent host
The Mask made a perfect companion for that purpose, allowing me to take multiple animals without spooking them with muzzle reports. And it was easily threaded on and off of my firearms, and had what I consider minimal shift. The stainless mounting threads and square cut breach cap provide an excellent interface with the host.
Through the winter time the mask stayed with me and my rimfires, providing the children with all kinds of fun. All while not adding a bunch of length or weight to the host rifle.
With so many admittedly good options out there, what would make you choose the Mask over something else? Its a subject I’ve often thought about, not just with the Mask but all kinds of products. I have other rimfire suppressors, and to be perfectly honest there is not a huge disparity between them all. Which again begs the question, why pick one over the other? Obviously there is a commercial aspect to the answer that has some validity, if there is only one suppressor in stock when you go to purchase one then it pretty much answers your question. Dead Air has done a great job at keeping up with demand, even during the darkest days of the last supply crisis I could still find an assortment of Dead Air suppressors in stock.
Pretty much all of the US suppressor market is domestically manufactured mostly if not wholly. So buying American is easy as far as that goes, but its nice to know that parts for my Dead Air cans were made just down the road a piece by some of my friends.
I don’t consider myself married to one particular manufacturer, as I have cans from several of the larger manufacturers. But if you are one of those people who likes to stick to one brand, you certainly wouldn’t go wrong picking Dead Air as that brand.
A pair of Marmots, one of which was not threatened by the report from the Maskthe Ruger RPR .22lr was an excellent host for the Mask
Price seems to be the most common decision factor on many things, the Mask has a street price as I write this around 420-480 dollars. That’s not exactly cheap for a rimfire suppressor, but you can surely spend a lot more money. And I wouldn’t bet the average shooter would see a huge difference between the Mask and suppressors that cost much more. So many times it can come down to who and where gives you the best price.
There are lighter suppressors, but we are talking in ounces so unless you are so high speed that two ounces is going to change your mind its probably not an issue.
Final words
The Dead Air Mask offers the same thing the rest of the Dead Air family does; excellent suppression and robust durability that won’t require a loan application (unless you want a really big collection). So if you are a Dead Air fan, or if you have been considering the Mask as an addition to your firearms collection I am here to tell you, you will love it. -CBM