Category Archives: Product review

Products and equipment

desert tech, WLVRN, us optics, fdn17x, blklbl bipod, rifle resting on bipod in front of cold winter mountains,

The US Optics Foundation 17X precision rifle scope

Preface

I love a good riflescope, one of the great things about having so many guns is getting riflescopes to go with them. The challenging optics market continues to push for the perfect scope, the one that has everything. Despite their best efforts, there are just too many eyes to please which leaves consumers to pick and choose the features that they find most useful. I say most useful, but there is also an associated cost with all these features. It is not uncommon to spend two to three times the cost of a rifle on the scope that goes with it. So there is a great deal of settling for when it comes to general consumers, for example choosing scopes in the 1000-1500 dollar range with similar features to a scope that costs twice that much.
I find myself lucky to live and work in a world that can help justify some of the best equipment available. And being a bit of a scope junkie, one place I enjoy some of the finest products is on the glass that sits on my rifles. I have used many of the best brands, but today as you might have guessed from the title we are looking at my latest purchase from US Optics.

Perfectly at home on an MPA competition rifle

The US Optics Foundation 17X

The Foundation series of riflescopes is US Optics premier line of US made sights. I’ve had several US Optics scopes over the years, last year was my first dip into the Foundation series with my Foundation 25X. And after running that scope hard for over a year now, swapping it between multiple rifles, and packing it all over the Rocky Mountains from here to nearly Canada. It has hit the top of my list, always keeping zero, and precise adjustments have kept me always on target. I’ve used it hunting everything from antelope on the plains of Wyoming, to the dark bears of Montana’s Kootenai Forest, and the elusive elk of the Uinta Mountains.
I’ve also been running 5-25’s for some years now, and I wanted to try something different. Particularly because I rarely use them on maximum power for anything other than inspecting potential targets, so the next obvious choice for me was the US Optics Foundation 17X.

us optics fdn17x
The FDN17X mounted to a Ruger RPR 6.5CM

The FDN17x uses the same 34mm tube as the other Foundation scopes, and at its heart is the ER3K turret above the erector. The third generation of the EREK system allows the erector to be adjusted with a center screw to the rifles zero, without moving the turret itself from its zero. This allows full turret rotation, and it also keeps all turret movement in the up direction from its stop. Unless of course I’m lost and barmy, in which case someone will be along to correct me in a few seconds.

The FDN17X has since ended up on this handsome Ruger M77, read more about that here

The objective lens on the FDN17x is a modest 50mm, slightly smaller than its bigger sibling. The windage is controlled with a capped US #1 windage knob, and it stays capped for the most part as I rarely dial any wind once I have a zero. Another standard feature of the Foundation series is the illumination, using a simple and single button to power up and select brightness settings. I can count on my fingers the times I’ve really needed illumination, but I can also tell you I never would have made those shots without it. Everybody has red illumination, so last time I ordered my FDN25X I selected green illumination. And this time around just to be different, I chose the blue illumination. I’ve yet to decide which of the three colors I like the best, but its nice to be given the choice. Other improvements of the Foundation line is a shorter throw on the magnification ring, where one-hundred-eighty degrees of rotation takes you from minimum to maximum magnification.

us optics
Another great option I added on to both of my Foundation scopes was the internal bubble level. It is cunningly placed in the eyepiece just out of the way enough that you need to look for it to see it. From the shooting position you can simply adjust the focus of your eye and see the bubble and its markings to ensure your rifle is level without ever breaking your eye from the target in the scope.

Perhaps one of my favorite options with the Foundation series is the reticle choices, and I usually choose the JVCR. It is a Christmas tree style reticle, with just enough going on to not distract my brain from doing its thing. Subtensions as small as .1 MRAD are part of the reticle, but much more prevalent are the .2 and .5 subtensions.
The JVCR like most modern reticles gives the user a superior ability to spot misses and correct for them. The FDN17X and its siblings are first focal plane scopes, which I prefer over the alternative. The reticle always reads true regardless of the magnification setting, which allows you to easily measure and correct for a miss. Whether you dial or hold for that miss depends entirely on your preference, depending on the size of the correction I will often do either. Good reticles like the JVCR allow you to do exactly that without getting so much information in front of your eye that you can’t focus, or worse yet you lose your impact in the noise around the reticle.
Before mounting the scope to an actual rifle, I ran it through a few scope tracking tests to double check turret values and repeatability.
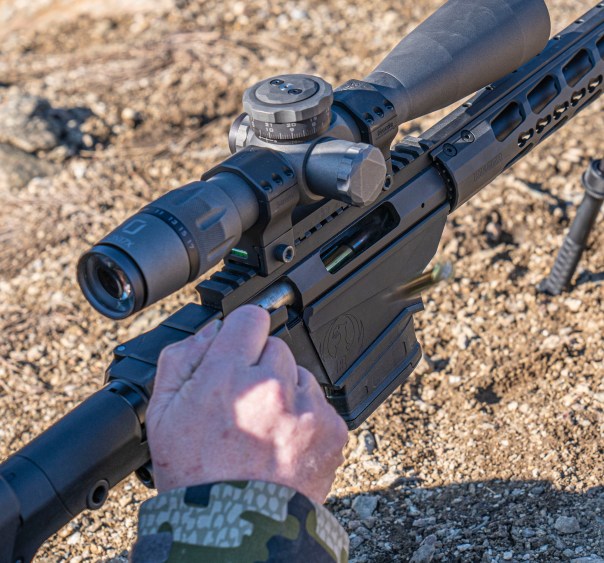
Mounted up!

I mounted the FDN17X into one of my 34mm scope-mounts, and leveled everything up. Bubble levels aren’t perfect, but they certainly can give you a very close to level mark. I carefully torqued down the scope rings checking the internal bubble level on the scope to see that it matched the bubble on the scope-mount, and triple checked them both against another level.

adjusting the zero of the ER3K turret

Then it was time to get it mounted up on a rifle, or a series of rifles better said. This scope was likely going to be one of my switch-around scopes, jumping from one rifle to another (I go through a lot of rifles). The first rifle I mounted the scope to was a Ruger RPR 6.5 Creedmoor, a great little rifle to wring out this scope and ensure it functions properly. Using the provided tools, I adjusted the ER3K knob to zero using my bore-sighting method. And after firing a few shots to confirm, I reset the zero according to impacts. Aside from this very convenient method, there are other things to like about the ER3K turret. I love the firm stop at zero, unlike the mushy stops from cheaper scopes achieved by shims, this thing stops on a dime. The large size of the knob gives you a very precise grip, and as you turn the turret to zero it stops hard. The turret has twelve MRAD per rotation, which for most of my rifles will take them out to their usable limits.
Today I was only able to take this little Ruger out to nine-hundred and fifty-yards, plenty far for sure, but not even into the second rotation of the FDN17X. As I am accustomed, I made corrections using the JVCR reticle, and using it to measure target sizes.
The clarity and brightness of this scope is superb, watching leaves flutter on the distant ridge made wind estimating more simple. Even at nine-hundred and fifty-yards picking out the soil rolling downhill from my misses was visible, as was the occasional snow flurry floating between my target and I.

us optics fdn17x desert Tech MDRX
The FDN17X mounted to my Desert Tech MDRX

Another day brought another rifle, the FDN17X was destined to end up on one of my MDRX rifles. This one has just received the 6.5 Creedmoor conversion kit in it, with a twenty-inch barrel and the new Blk Lbl Bipod twenty-inch handguard installed. The beautiful Tungsten Cerakote of this scope didn’t exactly match the black of the rifle, but I’m okay with that.
I quickly reset the zero on the ER3K turret using the Allen wrenches, and in no time I was ready to go. The 6.5CM MDRX is not quite as accurate as the RPR was, but still plenty accurate for many purposes. In the snowy and cold desert of the Great basin, I picked out a small white rock across a long draw. It was five-hundred and fifty yards according to my rangefinder, so after consulting my drop chart for this rifle I dialed 3.7 MRAD elevation and began evaluating the cold wind. My estimates put my wind-hold right at .6 MRAD, which is real convenient to hold with the JVCR. To me there are few things more satisfying than first round hits, and watching that first round pulverize the rock into a bright dust-cloud was exactly that. I spent an entire afternoon picking out little targets at varying distances out to seven-hundred forty-five and nine-hundred yards. I find the offset two-tenths sub tensions of the JVCR very handy and quick to make sense, this is particularly handy when you shoot in wide open spaces and mountains where the wind switches direction faster than a politician.

note bubble level at bottom of scope

Am I wrong?

As I said in the beginning, it’s hard to make a perfect scope that fits everyone’s needs. But I’ve found that for my purposes, these Foundation scopes seem to fit me perfectly. I don’t know if that means US Optics just nailed it, or if I’m past my prime and simply content with what I’m used to. The ease of use with the ER3K elevation turret, the clear and bright clean images through the glass, and no need for an external anti-cant level make this scope very user friendly. And though I haven’t abused this one just yet other than smacking it into a few rocks, I have no doubt it will be as robust as the other USO scopes that I have abused thoroughly.

another custom Remington used with the FDN17X

This scope is already lined up to go on several other rifles, I look forward to a bright future shooting with it. The moderate magnification and size will fit perfectly into a well used portion of my gun collection, and more than likely it will see some killing come this fall.

-CBM

Henry Survival Rifle

Preface

When you are a child, your ability to pick and choose a firearms to shoot are pretty grim, you basically get whatever adults allow you. As I remember back to my earliest shooting experiences however, I distinctly remember having an affinity for a particular rifle. My Grandfather is the source of much of my firearm affection, and as soon as I was old enough to hold a gun, Grandpa was happy to help me with one. And every time we visited Grandpa, I always asked him to get out the AR-7. Known today as the Henry survival rifle.

A young Coldboremiracle clearly ignorant of shooting form

The AR-7 Rifle

The AR-7 came about in the late fifties from the man himself during his time at Armalite. The whole idea behind the rifle was to have a compact takedown rifle that could be easily stowed in aircraft or vehicles for use as an emergency survival weapon. It is a blow-back operated semi-automatic rifle that uses detachable ten-round box magazines. The peculiar look of the rifle is due to it’s core-design to be taken down to a very compact sixteen-inches. The action, barrel and spare magazines are stored inside the polymer buttstock when the rubberized rear cap is removed. The rifle is assembled by attaching the action to the stock with a captured thumbscrew, the barrel is then seated in the action indexed with a pin, and a barrel nut holds the ensemble together. The simple design was meant to be functional, more than beautiful.
As a child, I killed a lots of cans with Grandpa’s AR-7, though I believe my love for the rifle had more to do with the semi-auto feature than anything else.

Un-boxing

henry survival rifle, backpack
the rifle easily stowed in my Badlands Backpack

It’s not often that you nearly miss a whole gun because the box is so small, but that nearly happened with the AR-7. The boys in the warehouse nearly tossed it out with empty boxes because “there’s no way there’s a rifle in there.” But as I opened the box, I saw that old familiar shape that I always looked for at Grandpa’s house.
In less than a minute I pulled the rifle out of the stock and had it assembled, much to the surprise of the young fellows behind the counter who had never seen such a thing. Just as I remembered, the rifle was easy, light, and fugly as can be. The design of the rifle and its compact stowage impede the practical use of a rifle scope, though it does have a rimfire sized mounting rail. But for a survival rifle like this I suppose I could make an exception for once and go without a riflescope.

Survival?

In perhaps a foolish decision, I decided to put the rifle to an actual test of its stated purpose. I decided I would take it into the cold and snow-covered Rocky Mountains, to see if the rifle could prove itself as an actual survival weapon. A 22Lr is not exactly the best option in my opinion, but plenty of folks have taken deer with them over the decades. Of course, my survival situation being self-induced, demanded I follow the local hunting regulations so deer was off the menu.

Compact storage is one of the paramount benefits of the AR7

With a few snacks and a water bottle in my bag, and an odd-looking bulge in the side of my backpack, I headed into the white frosted mountains near my home. Had I actually been lost in these mountains and starving, I’m quite confident I could get within fifty yards of a deer and eat well for a few days. Since that option wasn’t available to me, I had no choice but to seek the game that was available to me. I’ve never tried coyotes, and it would surely have to be a survival situation for me to start on one. So, all that left me for table fare would be a very small assortment of rabbits, hares, possibly a squirrel if I could find one mad enough to brave this cold. I suppose people eat coons too, but he’s way down my list next to the coyote.
I happened across a covey of Chukar Partridges earlier today, so perhaps if I could get the Henry AR-7 to shoot shot shells I could even have a tasty bird dish. Either way I would be cooking my prize over a fire improvised from whatever dry wood I could find.

Before I got too far into this survival trip, I figured I’d better get proficient with the rifle that my life depended on. And since this wasn’t a traditional survival episode, I figured I could carry a bunch of extra ammo to practice with. Using pinecones on a fallen pine tree as a target, I tested my aim using the rear peep-sight on the AR-7. After a magazine or two I felt I had the hold figured out. I was actually quite surprised at how repeatable the shots were with the little AR7, even at one-hundred yards, repeatedly hitting grapefruit sized targets was not that hard. Though there was a concern in my mind about a shift in impact should I disassemble the rifle and risk having to start all over. But overall, I felt that most any small game animal inside forty to fifty yards could end up on a stick over my fire. Continue Reading Here…


The controls of the AR-7 are extremely simple and intuitive. There is a lever safety on the right-side rear of the receiver, and the magazine release is tucked into the side of the trigger guard. The magazines themselves slide neatly into the magwell just in front of the triggerguard and they double as a feed-ramp, good ones apparently as I saw no malfunctions in shooting the rifle.

The charging handle sticks out the side of the receiver, it collapses into the bolt for storage. I wasn’t sure if it had some kind of retainer that keeps it extended or collapsed, but it was a tiny inconvenience to pull out the charging handle every ten or so rounds.

Finding Survival Game

After familiarizing myself once again with the rifle, I continued my trek into the wilderness. I found a shelter that was akin to a cave. It did provide good shelter from any rain or snow that might fall, and it gave me a place to build a fire and keep wood dry. There I left most of my gear and set off to find a meal. The river nearby provided plenty of water should I need it, but for this exercise I figured I’d forgo the unsavory stomach cramps that come with it and bring my own. I knew if I walked long enough, I would find a rabbit or squirrel, and sure enough I managed to spot one sneaking through the brush.

A good-sized boar squirrel enjoying the warming sunshine. I cautiously followed him hoping to spot him motionless among the vegetation and rocks. The gun was already halfway up, so I shouldered it and focused the front sight on him as he paused. I pulled the trigger, a couple times, and my prize came rolling down the steep embankment towards me. With all the confidence of a starving castaway, I walked up to my treasure and soon to be meal and smiled.

I placed the squirrel into my pack and continued my search for another, one squirrel wasn’t going to keep me going for long. Another squirrel also made the mistake of sunning himself too long, and after collecting him I cleaned the two of them and washed up in some snow.

Magnum Research MLR 10/22

Introduction

Am I the only one that had no idea Magnum Research made a 10/22 clone? I knew they made more than the famous Desert Eagle, but was completely surprised to find out that they also make this handsome copy of the famous Ruger so many have learned to shoot with. I guess I have a bit of an excuse for my ignorance on the subject as I’m not particularly a big rimfire shooter. That said I wasn’t going to turn down an opportunity to shoot something new.

The Magnum Research MLR

The Magnum Research MLR claims to improve on the extremely popular 10/22 design, particularly with a significant focus on accuracy.
The forged receiver and quality barrels are likely to be the basis for this accuracy. The MLR also features an oversized charging handle, as well as an elevated sighting rail. The model I tested also featured a carbon wrapped barrel and a polymer stock reminiscent of some type of AR 15. The stock uses a pistol grip and collapsible butt with various length of pull settings, and in the butt itself there are two holes for storing extra ten-round magazines.
The controls were all very familiar, matching the Ruger models. Mag release, bolt stop, and safety are all in the same spots and retain the same function. The MLR did use an extended magazine release, which I found to be very handy.

Rangetime

I shot the rifle in a couple different configurations, one was with a Trijicon red dot, and the other was using a Crimson Trace 3-12 riflescope. The red dot configuration was obvious a shoot fast and dirty kind of setup, like something I would use hunting jackrabbits out in the desert. For accuracy I knew I would see much better results using the riflescope, I mounted up a Crimson Trace 3-12 scope on the rifle and headed back to the hills to zero it.
Zeroing took a few shots, but once I had it dialed in I was in business. I tried a couple different types of ammo, I didn’t have a huge selection because beggars can’t be choosers nowadays. The rifle seemed to prefer the CCI Mini Mags over the CCI Tactical AR ammunition, which at fifty-yards produced ten shot groups around an inch pattern. With accuracy like that, I found that shooting clay targets out to two-hundred-fifty yards pretty easy. I’d imagine if you used higher quality ammunition it would shoot even better. The MLR was very predictable, and shooting it became very addicting.

I used the rifle for several hikes on the mountain with my dog, the lightweight rifle was a perfect little hiking companion. The collapsible stock made it more compact to carry, and the readily available magazines made quick loading a breeze. Using the rifle for plinking random little targets was a great way to enjoy a sunny afternoon.

Pro’s and Con’s

There are a plethora of benefits to making a clone of a very popular rifle, one of which would be all the aftermarket support you can take advantage of. The 10/22 market is probably the largest rimfire aftermarket, which gives you all kinds of options for stocks/chassis, triggers, barrels and so on. Today’s gun owner is as much a tinkerer as anything, so it’s nice to have so many options for tinker fodder. I could easily see myself swapping out some parts on this rifle, the stock for example was very useful, but not exactly what I would have chosen. The trigger is fine in my opinion, but it never hurts my feelings to have a better trigger, so it wouldn’t hurt to install the best option available. Continue Reading Here…

The 10/22 magazines are perhaps one of the best attributes and options. The capacities range far and wide. This gives the shooter an opportunity to utilize what best fits their purposes.

10/22 mags are abundant in the wild and the MLR does a good job of providing additional storage

The carbon-wrapped barrel on the MLR provides a definite advantage in weight. Rimfire cartridges are rarely known for any recoil, so there is hardly as much advantage to a heavy barrel when shooting .22. But the thick profile of the carbon barrel likely aids in stiffening the barrel and providing better accuracy.

As much as I appreciated the barrel though, I would have traded it out for an equivalent option that was threaded. It is nearly heresy in these modern times to offer an unthreaded barrel on anything other than a very baseline economy-model firearm. Suppressors are the latest craze, and I find shooting loud to be more than just imprudent.

Shop all Magnum Research firearms, it’s perfectly legal…

Another small gripe that I’ll admit is very subjective. It’s the sight rail on the MLR receiver. It is a spacious and robust mounting platform for optical sights, but I did find myself wishing it was removable to use the rifle for different configurations and chassis options. Not a big deal, but worth a mention in my book.

CONCLUSION

My overall impression of the MLR was a very positive one. I would happily add another one to my collection of rifles if for nothing more than to have a good .22 handy. The MLR has plenty of options for customization should you choose that route, and it is also just fine the way it is.

It would make a great little plinking rifle for weekend pleasure shooting. Or, if you really wanted to get into the new NRL Rimfire league matches, it would be a good place to put it to work as well. I look forward to terrorizing the local small game scene with this rifle as soon as winter loosens its grip. Until then, I will use it to practice my shooting fundamentals.

-CBM

Need more .22LR? Click here to see more 

The Tanfoglio Appeal 22 Magnum

There have been countless disputes between gun owners since their invention, one of the larger disputes among gun owners in recent decades has been about bullpups. There seems to be a staunch hostility towards the diminutive stature of these firearms by a majority of gun owners. I myself am a convert to the cult of bullpups, and a decade later my safe is full of them. I only bring this up because today’s subject is another bullpup, the Appeal by Tanfoglio. I would like to preface my analysis with the disclaimer that my name is Jeff and I too am a bullpup fan.

The Bullpup
The Appeal is a polymer framed bullpup rimfire carbine. For those that are new to bullpups, and what the name means, we’ll go over it quickly. Bullpup configurations mean that the magazine and action are behind the trigger, and as you might imagine the hatred many have for the bullpup design is typically due to several differences resulting from that key feature. Magazines placed behind the trigger require different muscle memory for reloading, as well as often awkward controls due to their placement. And perhaps the most frequent complaint is the triggers, most of which are connected to the sear pack with some kind of linkage.

The Appeal
The Appeal utilizes a upper and lower clamshell-type frame, with the fire controls, magazine, barrel and such located in the lower part of the housing. The upper and smaller half of the frame carries the charging handle and a Famas-like elevated optics rail that doubles as a carry handle. The model I received was chambered in 22 Magnum, but it is also available in 22LR. The rimfire cartridges are fed from detachable magazines that hold ten rounds, and are very reminiscent of pistol magazines. The rifle is ambidextrous, which with bullpups can be a big deal. Spent brass ejects from the rifle along the same longitude as your face, and you don’t want to catch a mouthful of brass because of an unfortunate cerebral development in your formative years. (easy, that was a joke)
The Appeal features a reversible ejection cover to swap from right to left, and the charging handle can also be pulled from the carrier and installed on the opposite side. The Appeal uses a thumbhole like chassis, and the magazine release is centrally located at the bottom rear of the thumbhole. The bolt-lock is located on the left side of the rifle just above the grip area, and the safety is a push-push type located at the front of the trigger guard. At the hazardous end of the rifle there is a curious muzzle brake that is attached not to the barrel but the chassis itself. The muzzle is hidden a few inches behind, cradled inside the polymer chassis.

Did you say Tanfoglio?
When I saw Tanfoglio on the paperwork, I must admit I was very excited. And yet as I opened the box I found myself somewhat confused, I didn’t even know Tanfoglio made such a thing. And despite my proclivity for bullpups, the Appeal looked like a naked mole-rat in my nest instead of an ugly duckling. If I’m honest, I was expecting something a little more zesty Italian and less Kirkland Signature ranch if you know what I mean.
I shouldered the rifle immediately, and started to feel it out. The balance was good, which most bullpups are. The thumbhole stock wasn’t uncomfortable, but it did seem a bit minimalist. The thing that surprised me the most was the mag release, it was located such that you sorta pinch it with thumb and forefinger and the mag drops into the palm of your hand. Despite having to relearn the task typical to bullpups, I found it a decent one. The trigger feels about like most bullpup triggers, which isn’t exactly praise. But I guess I could say it was better than many other bullpup triggers I’ve felt. The action is smooth and short, which also is pretty typical of a polymer framed gun. Perhaps the most awkward part of the rifle is the elevated optics mounting rail, which I found almost too tall to be useful. It does have integrated iron sights as part of the rail, which are plenty tall for my facial structure. But as soon as you install nearly any kind of red dot or other optical sight, I found myself nearly putting my chin on the cheekrest.
I removed the polymer muzzle brake in hopes of at least finding a threaded muzzle underneath, but that was another unfortunate miss for me. Continue Reading Here…

Tikka T1X MTR

Tikka

Tikka has made a great name for themselves here in the US firearms market. Ask the question in most any forum about what is the best buy for a sharp shooting rifle, and many of the comments immediately start coming back with: Tikka, T3X, and so on. Today we are taking a look at another popular model, the Tikka T1X rimfire. The T1X maintains a great deal of Tikkas popular design and features, some of them just downsized to fit the rimfire sized action.

Opening the box

I have to admit, I was quite pleasantly surprised when I opened the box containing the T1X. The handsome little rifle had come to me married to a Boyd’s At-One hardwood stock, in a bright red color. The handsome curves of Tikka actions flow very well with the aesthetics of the stock, and the fit was good and tight as well. Of course after checking the rifle I had to get it to my shoulder and see how it felt. The thumbhole-stock was not what I call a good fit to my hand, but it was not an issue at all as I generally run my thumb parallel to my trigger finger.

Handsome polymer sections were placed at all the likely ground contact points, and dual front sling-studs for both a sling and a bipod. The polished finish of the T1X bolt-knob was reminiscent of every T3 rifle I’ve ever shot, and ran similar as well. But I was so expecting to feel what my T3 does, that it caught me off guard to have such a short bolt-throw and stroke. The trigger in the T1X is a great little single stage trigger, the clean break also reminded me of the trigger I fell in love with on my T3. The rifle came chambered with a twenty-inch .17HMR barrel with a one-in-nine twist, and as it should be, the muzzle was nicely crowned and threaded 1/2-28 which is exactly what my host-less rimfire cans need. The detachable ten-round magazine fits neatly into the bottom of the stock, and the forward mounted release tab is easily manipulated for loading. At the back of the stock, there are depressible buttons to adjust both the comb height and length of pull. This feature made the rifle easily fitted to a new shooter in just a few seconds.

Time to burn some ammo

With rifle and ammo in hand, I headed to my shooting spot to get this Tikka warmed up. I had mounted my Kahles 318i on the rifle, which is much more scope than this rifle needs. But the high quality scope made an excellent addition to the rifle and was sure to give solid confirmation on the accuracy of the T1X.
I adjusted the stock to get the best eye relief and feel, the adjustments on the stock only required that you push in and then adjust the height of the comb or length of the recoil pad. A simple depressing of a button seemed a little too simple and potentially easy to accidentally move, but to my surprise they were quite stiff. As a matter of fact, I had quite a time getting the recoil pad adjusted due to the force required to push the button. This is a small concern for me, as its not something I expect to adjust frequently.

Is Kahles too much scope for a rimfire, no. Get one for yours

Next was bore-sighting the rifle. I’ve never seen the need for bore-sighting tools, my Grandfather taught me his method learned through an artillery sight in Korea. I simply set the rifle up on a Harris bipod, and centered an easily identified object at the center of the bore. The key here is to ensure that your eye is perfectly aligned behind the breech. The circular shapes of the action, bore, and muzzle should all be concentric, and then your distant object centered in the middle of the bore hole. That’s the easy part, once you’ve got that, you need to very carefully and without shifting the rifle in any direction adjust your scope turrets until the crosshair is centered on the same distant object in the scope. I’ve done it this way for decades now, and its always on paper, and occasionally dead nuts on target. Continue Reading Here…

SHOOTING SUPPRESSED AND OTHER RANGE NOTES

I wanted to start shooting the rifle with a bare muzzle, mainly for those of you who plan to shoot it that way, too. I only shoot loud if I must, so the majority of my shooting was done through my new Yankee Hill Machine Phantom 22 suppressor. I also find it slightly interesting to see the offset when shooting a rifle with and without a suppressor. It’s not a huge deal, but on the off chance I find myself shooting without my can, I like to know where the shift is.

The T1x obviously has no real recoil. It’s not a light rifle as far as rimfires go, and the .17 HMR is basically the smallest magnum in existence. The recoil was more of a jolt in no particular direction, which makes spotting your shots easy. In no time at all, I had adjusted my K318i to zero and shot a few patterns to see how the rifle performed. I only had a couple of kinds of ammo to try – the old standard Hornady 17-grain V-Max load and the CCI 20-grain hollow-point load. Both of them shot the lights out, and there wasn’t a squirrel left in the county that was safe inside 200 yards.

Shooting the Tikka was an absolute pleasure. I like heavier-than-standard rifles because of the lack of recoil and general accuracy, and the T1x is exactly what I want in a rimfire rifle. The trigger breaking was perfect every time, and I love watching my impacts right as the trigger breaks. It’s quite a shame that it is the middle of winter. Otherwise, I would have taken the Tikka out for one of my favorite varmint hunts. Unfortunately, all my marmots are buried safely under several feet of snow.

The Tikka T1x shoots great, and 50-yard groups were easily half an inch in diameter. At 100 yards, it opened up a little bit, with 10-shot groups hovering right around 1 inch. Though, I think it does shoot a little better with the Phantom 22 installed, which doesn’t surprise me.

THE DOWNSIDE


Tikka T1x .17 HMR Bolt-Action Rifle
There were only a few small gripes that I could find, one being that the bolt wasn’t quite as smooth as expected based on my other, more expensive, Tikkas

I hoped that I would find this rifle near perfect, but I can come up with a couple of gripes for those of you looking to talk yourself out of it. I’ve mentioned the weight a couple of times. I like it just the way it is, but I can surely see somebody else thinking it’s too heavy. For youth shooters, I can definitely see it being a smidge much for the smallest framed among them. But if you fancy yourself an adult like me, then the weight is no big deal.

I never had a problem running the bolt, but it was a bit sticky for a Tikka. My other Tikka rifles have perhaps spoiled me. They are just as smooth as rifles that cost two or three times as much. I imagine this comes from the short length of the T1x bolt. There was just a little bit of a grab sometimes when running it, but I imagine I would easily get used to it with increased shooting frequency.

The Boyds stock was very sturdy and particularly handsome, but there were just a couple of things I’d change. The thumbhole stock always seems to be a love or hate thing with me. Some fit the hand well, and others just won’t. This one was a no for me, but as I mentioned, I don’t care because I don’t put my thumb through it anyway. Your results may vary.

The hard button to adjust the stock was also a little irritating but not a deal-breaker in anyway. And, lastly, there seemed to be a very small misalignment between rifle and stock, with the barrel not being perfectly centered in the stock. The T1x is mounted very well, much like a center-fire rifle would be. It probably wouldn’t take much to correct the issue, but it certainly didn’t affect the shooting enough for me to care.

CONCLUSION

My tastes in rifles may run a bit rich, but I’m okay with that. If I was buying another rimfire rifle, it would definitely be this one or one comparable to this T1x. I could even see myself buying a small collection of Tikka’s in .17 HMR and .22 LR. I think this rifle stands squarely at the front of the rifles in its price range, and it’s well worth your time if you need a new rimfire rifle.

-CBM

The Ruger Precision Rifle 6.5 Creedmoor

Introduction

The Ruger Precision rifle 6.5 Creedmoor took the precision rifle world for quite a ride when it first came out. Ruger made an excellent move by introducing an affordable rifle into an arena that was dominated by expensive custom-built rifles and actual sniper rifles. And in another stroke of genius they managed to make a rifle that appealed to the AR-15 crowd at the same time, which brought even more customers into their fold.
Ruger Precision rifle 6.5 creedmoor

The RPR

The Ruger Precision Rifle utilizes a bolt action receiver that is built into a chassis. It is fed by SR-25 pattern 308 sized P-mags for the 308, 6mm, and 6.5 chambered rifles. This rifle seems to almost clone the aesthetics of the extremely popular AR 15. Using the same pistol grip, and similar operation for the safety. Today’s test model also includes a folding butt stock for shortening the footprint of the rifle when transporting.

A twenty-four inch hammer forged barrel uses 5R rifling which if you ask the internet is the only good kind of rifling.  Long-range shooters prefer things like the one-in-eight twist barrel as it is ideal for launching the heavy for caliber bullets.  Weighing in at ten and a half pounds, the rifle is about forty-five inches long unless you fold it, in which case it is thirty-five inches long.

Check out my review of the Ruger RPR .22LR as well

Try It

Having been one of those in the community with a preference for the custom built rifle, it took me some time to actually give the Ruger a try. To be honest I did look down at it a bit, perhaps like many others I was angry that it shot just as good as rifles that cost twice as much or more.

But it didn’t take long for the RPR to prove its worth to those in the community, and now a days its common to see them shooting at top PRS events. I shot in the Hornady Precision Rifle Challenge this past summer. There we saw several RPR’s including Doug Koenig who did extremely well shooting with significantly more expensive competitors, taking home the top Production Rifle trophy.
Ruger Precision Rifle 6.5 Creedmoor
After all this time I figured it was time for me to open up to the Ruger, so I took the opportunity when it came. Opening up the box, I found the all black rifle complete with a magazine, bipod and a few other items. It took a few minutes to familiarize myself with the rifle, and get a feel for the controls and such. For me there are couple things that stand out when first handling a rifle, the first one is throwing the bolt. Quickly I shouldered the rifle and ran the bolt a few times, you can tell a lot about a rifle by the feel of the bolt-throw.

More Ruger Precision Rifle features

Bolt manipulation of the Ruger Precision Rifle was smooth and had a positive lockup feel when closed into battery. You could also feel a metal on plastic sensation a little bit which I assumed to be the piece at the rear of the bolt. Not that there was anything negative about it, as plastic on metal frequently gives a low-friction feeling which I do like. Bolt lift was not bad, but did take a little bit of getting used to. Not bad, obviously not as good as some of the other rifle actions frequently used today.

Among the features that seal the deal for me is the trigger pull. While I don’t consider myself a trigger snob, I do enjoy a perfect trigger whenever I can. Ruger’s trigger on the RPR was a good one, clean and without the abrasive skipping often felt on triggers of lower tiered firearms. I’ve never been a big fan of blade safeties. When they first came out many years ago, the first thing I did was figure out how to remove them. That being said I wasn’t so hateful of this one to look for a way to remove it.

Shop ruger Precision Rifles here

The main safety was in the same place your traditional AR style rifle safety goes, which made it very convenient and familiar to use. It wouldn’t hurt my feelings if they put it on both sides like AR’s often do, but certainly not a deal breaker.

This RPR runs on 308 sized P-Mags, and it came with a ten-round magazine. After some range time I would try the twenty-round ones as well, just in case you ever needed to do some long strings of fire.
Including a folding buttstock of the rifle made it much shorter for transportation, and doubled as a quick way to remove the bolt for inspection, lube, or cleaning. Up front we had the hammer-forged twenty-four inch barrel inside a free-floated handguard. Cut into the muzzle of the barrel are 5/8-24 threads. Which was great because I planned on mounting some stuff there.

The handguard on my particular rifle uses KeyMod for accessory attachment. But they are also available in the more modern and useful M-Lok. I secured the Atlas bipod to the pic rail underneath, and then I was ready to mount up a riflescope. Continue Reading Here…

A good rifle deserves an even better scope, like the US Optics FDN17x

FIRST SHOTS

Running the bolt forward on a cartridge felt smooth and controlled. I could often feel the slightest bind as the bolt closed the last few degrees. Almost like the extractor was having trouble snapping over the cartridge rims. As I brought the reticle to rest on my point of aim, I took up the slack in the trigger and gave it a steady press.

Repeating the process another four times and made a nice little vertically strung group. I have noticed this tendency during this cold time of year. Particularly when both rifle and ammo are below freezing temperatures.

As the bore warms and each round is chambered into a progressively warmer chamber. Velocity increases slightly and brings the point of impact up a touch with each shot. Horizontal dispersion was minimal, and the overall group size was just under an inch.

That’s not too shabby using what most would consider plinking ammo, and the results were even better when shooting 140-grain match ammunition. I pushed the RPR out to half a mile to see how it performed. As I suspected, it was easy impacts. Recoil on the rifle wasn’t terrible, allowing me to spot my impacts at those extended ranges.

federal 6.5 creedmoor ammunition american eagle
Even the inexpensive American Eagle 120 grain ammo shot well

Suppressed

Shooting this rifle go without seeing how it does with a suppressor wasn’t an option to me. To that end, I pulled out my Yankee Hill Machine Nitro N20 suppressor. During my range time I noticed only a small change in point of impact. Likely due to the light weight of the Nitro.

It was beautiful to shoot in the open country of the mountains and listen to the long journey of the bullets. They hissed through the sky before they thumped into the target. I think the RPR deserves a good suppressor, it makes a great little rifle even better.

POSSIBLE DOWNSIDES?

At first, I wondered why they made it a 24-inch barrel versus a 26-inch barrel. After running around with this thing, I understand why.  If I had the ability to order the RPR from the factory, I would have done so with a shorter barrel length that was more like 20 inches.

Ruger Precision rifle 6.5 Creedmoor
rifle details; notice QD sling cup behind the grip, and locking mechanism for folding stock just above it

Adding a folding stock is great for reducing the length of the rifle, at least when you are trying to transport it. But another one of my complaints has to do with the folding mechanism, mainly that it only locks in the shooting position.

While it’s not a deal-breaker for me,  it would be really easy to get something pinched in the pivot point. Especially when the stock inevitably comes swinging back as you try and maneuver it.

The magazine release was also a touch tough for my taste. It was easy to falsely engage the magazine on this rifle to where it looked like it was in. Making you think it was secure, but was not really secured.

Ruger’s magazine release also seemed to require a touch more force than I would expect for such a simple and common motion. This is likely something that can be adjusted or corrected by the user, so don’t worry too much about it.

MY CONCLUSION

As I suspected, the Ruger Precision Rifle 6.5 Creedmoor is just what I thought it would be – a great-shooting production rifle with an entry-level price tag but professional results. Sure, it’s not as nice as the custom precision rifles out there.

And you can feel that it has been mass-produced. But nonetheless, the rifle performs very well in its capacity. It gives the user accurate shots, a familiar manual of arms, and pleasing aesthetics.

Above and beyond that, there are countless ways to customize and improve the rifle with excellent aftermarket support. I have some nice rifles in my safe. I wouldn’t trade any of them for a Ruger RPR, but I wouldn’t mind having a couple RPRs in the safe to give them company.

-CBM

Ruger RPR 6.5
The Atlas bipod makes an excellent addition to the rifle

LWRC REPR 7.62X51

History

If you were around back when the various SASS rifles hit the market, you may remember it was an exciting time for those of us who love precision shooting auto-loaders. It seemed like everybody made their submissions for the project, but not all of them were destined for adoption. Lucky for enthusiasts like myself, these rifles made their way into the commercial market where hungry aficionados waited for just such an opportunity. The REPR (Rapid Engagement Precision Rifle) from LWRC was one of those rifles, and many were the nights I creeped the internet forums and webpages longing for a REPR. The ebb and flow of life wouldn’t deign me the capital to buy such a gem for my modest collection, but life’s current has brought the white whale back into port.

The LWRC REPR

The REPR is a semi-automatic precision rifle chambered in 7.62X51, it is of obvious AR heritage and yet distinctively it stands alone. The REPR functions near the same as every other AR style rifle except for it’s short stroke gas piston operation and side charging handle. The controls of the rifle closely mimic everything you already know as far as mag release, bolt catch, safety, etc.

The REPR features a non-reciprocating side charging handle on the weak side of the rifle, as well as an ambidextrous bolt-catch that can be operated with either hand. The rifle is available in a few different barrel lengths, but this one is a twenty-inch barrel with a one-in-ten twist. At the loud end of the rifle you will find a two position gas block with a setting for normal and suppressed, something I intended to test thoroughly. The 5/8-24 threaded muzzle came with LWRC’s Ultra muzzle brake that uses three horizontal ports on each side to vent gas pressure and reduce recoil. The handguard features screw holes to attach an assortment of picatinny rails wherever you might need them, as long as it’s three, six,  nine, and twelve o’clock. The REPR comes with factory Magpul furniture. The MOE grip and PRS buttstock make an excellent interface with the triggerman, and are easily adjusted. Last but certainly not least, the rifle comes from the factory with a Geissele® SSA-E 2-Stage Precision Trigger which together with all the above mentioned features makes this rifle smooth and sexy without losing its sturdy and potent performance.

REPRoducing my dream

Its not often I go twenty-four hours without shooting a new gun, and I dang sure wasn’t going to break that tradition with this beauty. I spent a great deal of time playing with it, getting familiar with its differences and similarities. With a Leupold CQBSS 1-8 scope mounted in a Larue SPR mount, I grabbed some ammo and my tool kit and made my way to the cold and snowy mountains nearby.


Once there, I installed a bipod for some supported shooting while I zeroed the rifle. The ammo I started with was Hornady 155-grain match ammunition, True Velocity 168-grain Match, Underwood .308 Controlled Chaos, and finally some Desert Tech 175-grain Match. I have used all of these in other 1:10 twist rifles, so I expected it would do the same here.

Testing at 100 yards showed the 155-grain ammo to be the best choice, but the 175-grain would be the better performer at the significant distances I intended to reach. Accuracy for the Hornady ammo was around 1 MOA on average, while the Desert Tech load produced more along a 1.2-MOA average.

In outward appearances and functions, the REPR offers an an AR-style package

It could be that my shoulder wasn’t feeling it that day and shot the lighter recoiling ammo better. The .308 Win is not known for its high velocity, but I have used it for nearly my entire shooting career to distances many would consider irrational.

With the rifle zeroed and accuracy established, I immediately succumbed to my desire to stretch every rifle I ever shoot to as far as it will reasonably go. I picked out the exposed tips of stones protruding from the snow on the opposite side of the canyon for targets. The puff of rock and vaporized bullet are easily seen, and, if you miss, you can see it in the snow.

I pushed the REPR out to 1000 yards, which is arguably about as far as I ever really need to shoot. Repeated, easy hits between 400 and 800 yards gave me great confidence in my abilities behind the rifle, it just begged to be shot more.

Range target for LWRCI REPR
A typical group from the REPR. I believe the vertical stringing was caused from shooting the sub-freezing rifle and gaining velocity as it warmed up

IT’S HEATING UP AND SHOOTING SUPPRESSED

I also removed the muzzle brake to see how the rifle shot with a suppressor installed. Using primarily my Yankee Hill Machine R9, along with a few other cans I had laying around, I fired the rifle to see how the reduced gas setting would affect its cycling. The various suppressors did cause differing back pressures and feels, but they were all acceptable as a general observation. The accuracy seemed to tighten up a little bit with the suppressors, be it the additional weight added to the platform or a cleaner release of the bullet from the muzzle, and the rifle shot even better.

LWRCI REPR .7.62x51 Rifle
The rifle boasts a two-position gas block to help run a suppressor
 LWRCI REPR .7.62x51 Rifle
The groups actually tightened up while shooting the REPR suppressed

This anomaly was also accompanied by some additional recoil. Whether it was the lack of the muzzle-brake or the added gas pressure from the suppressor, the rifle seemed to jump a bit more. It also could be a combination of the two. Either way, I think the REPR could benefit from one more setting on the gas valve with just a touch less gas pressure.

ALL THINGS CONSIDERED


LWRCI REPR .7.62x51 Rifle
Here you can see the two-position gas block, not to mention the fine machining work on the rifle

Evaluating the REPR for exactly what it was built for brings us back to the Army’s Compact Semi-Automatic Sniper System program, which was meant to refine the semi-auto sniper rifle into something more compact, light, and lethal. It also had to do this without standing out too much from the other rifles in use. As tested, this rifle comes in at just under 10.5 pounds naked, which isn’t exactly light. But with the shorter-barreled version of the rifle, you can get the weight down to 9 pounds or less. These shorter barrels will obviously make it more compact and easier to maneuver as well.

The REPR meets those requirements very well, and the civilian market isn’t nearly as rigid as Uncle Sam. The rifle is very well built, and the intricate machine work and innovative designs are sure signs of outstanding American craftsmanship. The smooth operation of the action is extremely satisfying, as is the crisp break of the trigger. Little touches, like a built-in anti-wobble pin to keep the lower and upper receiver snug and high-quality coatings of both internal and exterior surfaces are certainly doing their part to justify this rifle’s starting price of $4,233.

LWRCI REPR .308 Rifle

Since this is an evaluation, I’d be careless to not include my negative marks for those looking to knit pick. The 20-inch version of this rifle isn’t light, and most of the weight is way out front. I think I might have liked the 16-inch version a little more, but obviously this point is for each to decide.

The machine work on the receivers is immaculate, but I did find that the aluminum bosses surrounding some of the controls can inhibit good purchase. The mag release and bolt releases seem to be somewhat protected by the receiver. This may just be a reconditioning of the fingers, but I found that I’d frequently miss when blindly stabbing at the controls.

Lastly, I don’t consider myself a trigger snob, but I did find myself wanting to polish the first stage of the Geissele trigger. It wasn’t bad, but I could frequently feel a couple of steps of movement before hitting the second stage. This was a minimal issue for me, and certainly didn’t inhibit the hits from coming downrange, but I thought I’d mention it.

Continue Reading Here…

CONCLUSION

The LWRCI REPR is everything I dreamed about years ago. Only you can decide if it’s worth the price for your purposes. I think it is an outstanding rifle for anyone who wants to put heavy .308-sized hits on many targets at various ranges quickly. Or, if you just want a bunch of holes in something, it fulfills that purpose, too. High-quality American-made performance is what you can expect from the REPR. I’m happy I finally landed my white whale. Now if only I could afford to keep it.

-CBM

Dead Air Sandman K

The Project

In the search for a very small and useful rifle, my brother put together a 300 Blackout pistol. Though a deeply committed rifle junkie, I’m not exactly a huge Blackout proponent but I can surely see what the appeal is. One thing I do know for sure, is that unless you are going to run it suppressed, you are leaving most of the Blackout’s magic on the table. That is where todays subject comes in, the Sandman K was selected to go with this little project, and today we’ll take a look at how it performed the task.

The Sandman

The name suggests a peaceful slumber, I interpret that to mean the Sandman at a minimum won’t cause a huge disturbing raucous. Which is exactly what the Blackout was meant to avoid.
The Sandman family of suppressors was meant to provide heavy duty service to shooters who prefer suppressed fire. Dead Air claims the Stellite and stainless construction are among the most durable materials used in the suppressor market today. The suppressor is five and a half inches long, and weighs in at just under thirteen ounces. The Sandman has a thirty-caliber bore rated for cartridges up to 300 Winchester Magnum, and it also has available end caps with 5.56 and 6.5 bores. The Sandman mounts to Dead Air’s QD nitrided muzzle devices, they boast single-hand installation and removal that is simple and fast. All this comes with a Cerakote finish for a handsome and durable service life.

Installation

Once the Blackout pistol had been finished, it was time to install the KeyMount muzzle brake. This was a little bit of a challenge because the barrel was recessed inside the handguard, and to be sure it stayed there a serious thread-locking plan was undertaken. The KeyMount design is easy to understand, but I have had a couple issues with it. It uses a three lug ratchet cap that aligns with the muzzle device, and once pushed all the way down to the seat you can twist the suppressor a couple times tightening up the entire assembly on a tapered shoulder.

The Sandman and the Keymount brake
The Sandman on the 300blk rifle, note Holosun Sight and magnifyer

I say problems, but really it was just a lack of training or getting used to the function of the Sandman. Getting the lugs lined up properly can take a few tries at first, much like a USB you have to try it the same way a couple times to get it right. Once the can is locked up though, it is solid as can be. The system is indeed quick, and strong which explains why so many have switched to it. One thing I did find, which I think can happen with many of these QD type suppressor mounts is they get quite tight to the mount at times. Particularly when whoever installed it did so with significant exertion, the suppressor can be a bit of a chore to break loose and even more so if it has been on the host for a significant period of shooting and time.
One of the great benefits of this system and again what has made it so popular and prolific is the ability to switch the suppressor between hosts quickly and easily. Having extra muzzle devices can give you a great many options for using the Sandman and others that utilize the same mounting system.

On the Range

Once the K-Man was mounted, we set to test firing the host, and adjusting the gas system for optimal operation. As you might expect from a can this small, there was a little more noise than I was used to for suppressed fire. I also noticed a fairly prominent first round pop, with an accompanying flash. Super-sonic shooting with the Sandman K was definitely louder than what I am used to, but again that is a normal and expected occurrence for a suppressor this short. K cans are typically used for different situations where maximum suppression is not the main goal of the suppressor. They are more just to take the edge off for shooting inside buildings or similar situations where massive muzzle blasts are particularly unwelcome.
Sub-sonic shooting on the other hand is much more tolerable, and the real reason the blackout shines. Sub-sonic ammunition doesn’t have the noise associated with bullets breaking the sound barrier, and the Sandman K does just enough to break up the noise produced by the muzzle-blast to make it very pleasant to shoot. And it does it while adding as little as possible to the length of the host firearm.

The complete Sandman clan

The Blackout and Sandman combo turned out to be a excellent pairing. Much better I think than had we run the K on a regular centerfire rifle such as a 308 or something similar. While it of course would provide some suppression, it would certainly not be hearing safe. To be fair very few suppressors are hearing “safe”, but my personal position is; I don’t collect stamps and pay money to continue using ear plugs. So for me the Sandman K is going to stick with subsonic hosts, or at a minimum with diminutive cartridges.

Get your own Dead Air Suppressor

Conclusion

There are so many excellent suppressors on the market today, but some I feel are better for niche uses. Would I recommend the Sandman K for a first time suppressor purchaser? Absolutely not. The S or L model on the other hand would be an excellent choice.
But if you are knee deep in stamps and trusts, there’s nothing wrong with having a few dedicated cans for very specific purposes or hosts. For that purpose I think the Sandman K is a bulletproof option, it is neither the first and certainly wont be the last can purchased for a calculated purpose around here. As for the little Blackout, it does its thing real quiet now.

-CBM

Check out more suppressors here